
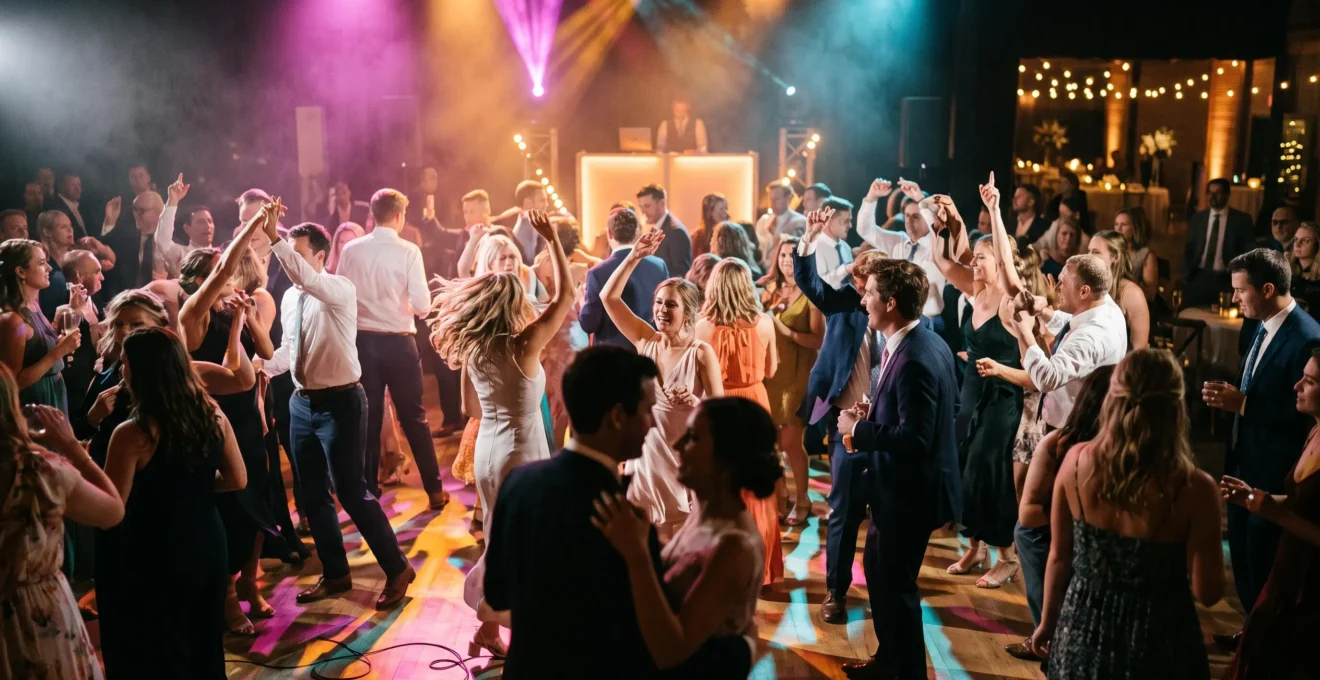
The solution to lifeless dance floor photos isn’t sharper images, but capturing the collective kinetic rhythm of the crowd as a single, living entity.
- Embrace intentional motion blur to convey movement and energy, rather than freezing every moment with a fast shutter speed.
- Use wide-angle lenses and get physically inside the action to create participatory shots that make the viewer feel like part of the celebration.
Recommendation: Shift your goal from documenting individuals to capturing the shared emotional pulse of the dance floor through a conscious blend of light, motion, and composition.
You’ve been there. The reception is electric. The bass is thumping, arms are in the air, and the entire room is a swirl of joyous, sweaty energy. You’re firing away, capturing what you think are the peak moments. But later, as you cull the images, the magic is gone. The photos are sharp, well-exposed, and technically correct, but they feel static, silent, and disconnected from the vibrant reality you witnessed. The explosive energy has been reduced to a collection of frozen, awkward poses. This is a common frustration for wedding photographers who feel their images fail to translate the sheer kinetic force of a great party.
The conventional wisdom is to freeze the action. Use a fast shutter speed, a powerful flash, and nail the focus to get a crystal-clear shot of a smiling face. While this has its place, it often misses the point entirely. The true energy of a dance floor is not found in a single, perfectly sharp subject; it’s in the shared movement, the blur of a spinning dress, the trails of DJ lights, and the feeling of being swept up in a collective moment. It’s what sociologists call “collective effervescence,” a feeling of unified excitement that creates a powerful emotional bond.
But what if the key wasn’t to fight the chaos, but to harness it? This guide is built on a different philosophy, one borrowed from the world of concert and live event photography. Instead of freezing time, we will learn to bend it. We will treat the dance floor not as a room full of individuals, but as a single, breathing organism with a visual pulse. The goal is to create images that don’t just *show* a party, but make the viewer *feel* the rhythm, hear the music, and experience the movement.
We will deconstruct the technical and compositional elements needed to capture this kinetic rhythm. We’ll explore why wide shots convey more energy, how to master motion blur with slow-sync flash, when to use different lighting setups, and how to position yourself to become part of the story. By the end, you will have a new framework for seeing and capturing the true, untamed spirit of the dance floor.
This comprehensive guide is structured to build your skills progressively, from understanding the core philosophy of energy capture to mastering the advanced techniques that bring it to life. Explore the sections below to transform your dance floor photography.
Summary: A Guide to Capturing Dynamic Dance Floor Photography
- Why Wide Dance Floor Crowd Shots Convey More Energy Than Tight Crops of Individual Dancers
- How to Combine Motion Blur With Sharp Subjects Using Slow-Sync Flash on Dance Floors
- Bounced On-Camera Flash or Off-Camera Directional Light: Which Creates Better Dance Floor Energy Photos
- The Static Position Mistake That Makes Dance Floor Coverage Feel Distant and Uninvolved
- When Dance Floor Energy Peaks: After First Dance or During Final Hour of the Reception
- Why Intentional Motion Blur at 1/15s Creates More Energetic Dance Photos Than Frozen 1/500s Sharpness
- How to Balance Existing Reception Lighting With Subtle Fill Flash for Natural-Looking Results
- How to Frame Dynamic Action and Movement for Visually Exciting Wedding Dance Floor Photography
Why Wide Dance Floor Crowd Shots Convey More Energy Than Tight Crops of Individual Dancers
The impulse to zoom in on a single, expressive dancer is strong, but it often tells an incomplete story. True dance floor energy is a group phenomenon. It’s the interaction, the shared laughter, and the synchronized movement of the collective that creates the atmosphere. A wide shot is the only way to capture this scope. It transforms the image from a portrait of one person into a narrative of a community celebrating. By showing the crowd as a whole, you document the collective effervescence, a term coined by sociologist Émile Durkheim to describe the unifying energy people feel in group rituals. As psychology professor Shira Gabriel explained to HuffPost Life, during these moments, there’s a strong feeling of connection to others and a feeling of sacredness, that something special is happening. This is the feeling a wide shot can convey.
A wider composition allows for layering, adding depth and context. You can frame the shot to include the core group of energetic dancers, the onlookers cheering from the sidelines, and the DJ’s lights painting the scene from the background. This creates a rich visual tapestry that feels immersive. It tells the viewer not just *who* was dancing, but where they were and what the environment felt like. Using a wide-angle lens (24-35mm) lets you get physically close to the action while still pulling in these crucial environmental details, making the viewer feel like they are right there in the middle of it all.
This layered approach gives the image a sense of scale and life that a tight crop on a single person lacks. The energy isn’t just in one person’s expression; it’s in the contrast between the sharp focus on a few and the blurred motion of the many, the interplay of light and shadow, and the visible connection between people. Framing for the collective experience is the first step toward creating images that resonate with the pulse of the party.
How to Combine Motion Blur With Sharp Subjects Using Slow-Sync Flash on Dance Floors
Slow-sync flash, often called “shutter drag,” is the cornerstone technique for capturing kinetic rhythm. It’s a method that intentionally combines a slow shutter speed with a burst of flash. The slow shutter speed allows the camera’s sensor to “paint” the ambient light and movement as beautiful, fluid trails. Simultaneously, the brief pop of flash freezes your primary subject, rendering them sharp and in focus amidst the swirl of motion. This technique perfectly balances the two worlds: the sharp, documentary reality of a person and the abstract, energetic reality of the dance floor environment. The result is an image that feels alive and dynamic, not sterile and frozen.
Mastering this technique requires balancing three key settings: shutter speed, aperture, and flash power. The shutter speed controls the amount of motion blur; the aperture manages the ambient light exposure; and the flash power determines the brightness of your frozen subject. A critical component is using rear curtain sync. This setting tells the flash to fire at the *end* of the exposure, just before the shutter closes. This creates light trails that appear to follow the subject, resulting in a more natural and intuitive depiction of movement, as if the energy is flowing from them.
Your Action Plan: Mastering Slow-Sync Flash
- Set the Shutter Speed: Start with a shutter speed around 1/10 to 1/30 of a second. This is slow enough to create visible motion blur but fast enough to maintain some control over the shot.
- Balance the Aperture: Adjust your aperture based on the ambient light. A range of f/2.8 to f/5.6 is a common starting point to let in enough environmental light without overexposing.
- Control the Flash: Use a low manual flash power setting, such as 1/32 or 1/64. The goal is a subtle fill light to freeze your subject, not to overpower the room’s atmosphere.
- Engage Rear Curtain Sync: Ensure your camera or trigger is set to rear curtain (or “2nd curtain”) sync. This makes the flash fire at the end of the exposure for natural-looking light trails.
- Experiment with Movement: Once your settings are dialed in, intentionally move your camera during the exposure. A quick pan, zoom, or twist can create dramatic and artistic effects that enhance the feeling of energy.
Case Study: The ‘Camera Twist’ Technique
A powerful variation of shutter drag is the “camera twist.” As described by SLR Lounge, this technique involves physically twisting the camera during the long exposure while a direct flash freezes the subject at the center. This is particularly effective for wedding guests dancing, as it draws the viewer’s eye to the frozen central subject while the swirling edges of the frame create a vortex of energy. It adds immense visual interest to what could otherwise be a standard, static shot, perfectly encapsulating the feeling of being in the middle of a spinning, energetic crowd.
Bounced On-Camera Flash or Off-Camera Directional Light: Which Creates Better Dance Floor Energy Photos
The choice of lighting is fundamental to the mood and narrative of your dance floor images. The two primary approaches, bounced on-camera flash and directional off-camera flash (OCF), create vastly different results, each with its own strengths for conveying energy. On-camera flash, bounced off a ceiling or wall, provides a soft, even light that feels participatory and immediate. It’s the “in the mosh-pit” perspective, perfect for capturing spontaneous, raw moments because you are highly mobile. Off-camera flash, placed on stands, creates a more polished, cinematic look with sculpted, directional light. This approach allows for dramatic effects like backlighting, silhouettes, and subject separation from the background.
Neither approach is inherently “better”; they simply tell different stories. Bounced flash excels at capturing the unpredictable, fast-changing action within the crowd, making the viewer feel like a guest at the party. OCF is superior for creating iconic, establishing shots, such as the first dance or a dramatic portrait of the couple surrounded by their cheering friends. The key is to choose the tool that matches your narrative goal for a specific moment. For peak energy capture in a dense crowd, the mobility of on-camera flash is often invaluable. For a controlled, high-impact image, the cinematic quality of OCF is unmatched.
| Criteria | On-Camera Bounced Flash | Off-Camera Flash (OCF) |
|---|---|---|
| Mobility | High — photographer moves freely within the crowd | Limited — light stands fixed at set positions |
| Narrative feel | Raw, participatory, ‘in the mosh-pit’ | Polished, cinematic, dramatic separation from background |
| Setup time | Minimal, ready instantly | Requires positioning and wireless triggering in advance |
| Light quality | Flat, even coverage from camera position | Directional, sculpted, can create glow or silhouette effects |
| Best use case | Spontaneous candid moments, fast-changing crowd action | Establishing shots, first dance, or dramatic backlit couple portraits |
To effectively use OCF for dramatic effect, place one or two speedlights on stands at the edges of the dance floor, often angled towards the center. Using modifiers like grids or small softboxes helps control light spill and focus the beam. It’s crucial to set this up well before the dancing begins, so you are ready to capture the moment without scrambling and disrupting the flow of the event.
The Static Position Mistake That Makes Dance Floor Coverage Feel Distant and Uninvolved
One of the biggest mistakes photographers make is shooting the dance floor from the sidelines. Standing at the edge of the room with a long lens creates a fundamental sense of separation. It positions the viewer as an outside observer, not an active participant. To capture energy, you must be in the energy. This means stepping onto the dance floor, moving with the rhythm, and becoming a temporary part of the crowd. This physical proximity is what allows for intimate, dynamic, and powerful compositions that feel authentic and involved.
Beyond just getting closer, changing your vertical angle can dramatically alter the emotional impact of an image. Shooting from a standing, eye-level position is the default, but it’s often the least interesting perspective. Crouching down and shooting from a low angle is a powerful technique to make your subjects feel larger-than-life. As noted by the editorial team at PhotoWorkout, this angle psychologically makes subjects feel more powerful, imposing, and authoritative. When a guest throws their hands in the air, a low-angle shot magnifies that gesture of joy, making it heroic and monumental. It transforms a simple dance move into a peak expression of freedom.
Of course, moving within a dance floor requires social grace. The key is to be a comfortable and positive presence. Make friends with guests during the day, so your proximity in the evening feels natural rather than intrusive. Move with purpose: step in, get the shot, and step out, always giving people space. Your goal is to be a seamless part of the environment, a friendly face who is there to celebrate the energy, not just document it from afar. This participatory approach is essential for creating images that feel genuinely connected to the moment.
When Dance Floor Energy Peaks: After First Dance or During Final Hour of the Reception
Capturing peak energy isn’t just about technique; it’s about timing. A reception’s energy level is not constant; it ebbs and flows in predictable waves. While the first dance is an emotional high point, it’s often more tender than energetic. The true kinetic peaks typically occur later in the evening. The first major explosion often happens in the 30-45 minutes immediately following the formal dances, when the DJ transitions to upbeat, familiar anthems and invites everyone onto the floor. This is a moment of collective release, and you need to be ready for it.
However, the most intense, uninhibited energy is frequently found in the final hour of the reception. By this point, formalities are long gone, drinks have been flowing, and the remaining crowd consists of the most dedicated partiers. This is when you’ll see the most passionate singing, the wildest dance moves, and the strongest displays of camaraderie. Anticipating this final crescendo is crucial. Stay vigilant, watch the crowd, and listen to the DJ’s song choices. When you hear a massive sing-along anthem start, that’s your cue to get in the middle of the action.
Being proactive is the key to capitalizing on these moments. Don’t wait for the energy to build before you prepare. You should anticipate it. As one expert photographer notes, a crucial principle is to pre-position your gear for any anticipated energy peak. This means setting up any off-camera lights during a lull, like dinner or speeches, so you’re not scrambling when the moment arrives. This applies whether you’re preparing for the first dance or the final, sweaty songs of the night. By understanding the rhythm of the evening and preparing in advance, you can place yourself in the right spot with the right gear before the explosion of energy even happens.
Stay alert for key events within the open dancing period, such as the bride and groom rejoining the floor, grandparents letting loose, or a bridal party starting an impromptu dance-off. These are mini-peaks within the larger energy wave and provide fantastic storytelling opportunities. Your job is to be a hunter of moments, always watching and anticipating where the next burst of joy will erupt.
Why Intentional Motion Blur at 1/15s Creates More Energetic Dance Photos Than Frozen 1/500s Sharpness
The pursuit of perfect sharpness is often the enemy of authentic energy. A shutter speed of 1/500s will freeze a dancer mid-air, but it also freezes the life out of the image. It creates a silent, static moment, devoid of the very movement that defines dancing. To convey energy, you must convey motion. Intentional motion blur, achieved with a slower shutter speed, is the tool for this job. It allows you to visually represent the passage of time within a single frame, showing not just where a person *is*, but where they have *been*.
As photographer Nic Hilton aptly puts it, shutter drag “adds motion, energy, and a little bit of magic to reception shots.” That magic comes from transforming the scene into a painterly blend of color and light. The DJ’s lasers, the ambient uplighting, and the movement of colorful clothing all blur together into beautiful, flowing streaks. To capture these vibrant swirls of color effectively, some photography tutorials recommend using a shutter speed of 1/10 sec or slower. At these speeds, the world becomes a canvas of light trails, and your flash-frozen subject becomes the anchor point of reality within an abstract dreamscape.
it adds motion, energy, and a little bit of magic to reception shots
– Nic Hilton, How to Shutter-Drag on the Dance Floor, Nic Hilton Photography
Think of it as the difference between a photograph and a feeling. A sharp photo at 1/500s says, “This is what this person looked like at this exact millisecond.” An image with motion blur at 1/15s says, “This is what it *felt* like to be in this room, swept up in the music and movement.” It’s a more honest, emotional, and visceral representation of the experience. It captures the chaos, the dynamism, and the kinetic rhythm that a frozen moment simply cannot.
How to Balance Existing Reception Lighting With Subtle Fill Flash for Natural-Looking Results
The worst dance floor photos are often the ones where a powerful, direct flash has obliterated the venue’s atmosphere. All the moody uplighting, the colorful DJ lasers, and the warm ambient glow are erased by a flat, harsh wall of light. The key to natural-looking results is to use flash as a subtle *enhancement*, not a replacement for the existing light. Your goal should be to balance your flash with the ambient light, preserving the mood and character of the room while gently lifting your subject out of the darkness.
This is achieved by thinking of your camera settings in two separate parts. Your aperture and ISO are primarily for exposing the background and capturing the ambient light. A wider aperture (like f/2.8) and a higher ISO (like 1600 or 3200) will allow your camera to soak in the room’s natural atmosphere. Your flash, on the other hand, is only there to expose your primary subject. By using it on a low manual power setting (e.g., 1/32 or 1/64), you add just enough light to define your subject without overpowering the scene. This combination is what creates a dynamic, vibrant look where both the subject and the environment feel alive.
The evidence of a perfectly balanced fill flash is often found in the subject’s eyes. A subtle, crisp catchlight indicates that the flash has done its job of adding life and dimension, while the surrounding reflections on the iris and eyelashes still show the colors of the ambient room lighting. This delicate touch ensures your subjects look three-dimensional and present in their environment, not like a cardboard cutout pasted onto a dark background. It’s a technique that requires practice, but mastering this balance is what separates amateur-looking flash work from professional, atmospheric event photography.
Key Takeaways
- The goal is to capture the collective kinetic rhythm, not just sharp individuals.
- Master slow-sync flash (shutter drag) to blend sharp subjects with beautiful motion blur.
- Get physically on the dance floor and use low angles to create immersive, powerful images.
How to Frame Dynamic Action and Movement for Visually Exciting Wedding Dance Floor Photography
Once you’ve mastered light and motion, the final layer of capturing energy is dynamic framing. A level horizon line suggests stability and calm—the exact opposite of a wild dance floor. To inject energy directly into your composition, you must break this stability. Tilting your camera to create a “Dutch angle” is a classic cinematic technique for just this reason. It creates diagonal lines that are inherently more dynamic than horizontal or vertical ones. As one production guide notes, Dutch angles can create a feeling of unease or suggest disorientation, which, in the context of a chaotic dance floor, translates perfectly into a feeling of high-energy excitement.
Another powerful framing tool is your flash zoom. Instead of leaving it on a wide setting, try zooming your flash head in (e.g., to 105mm or more). This creates a tighter, more focused beam of light, like a spotlight. This “edgier,” photojournalistic effect creates high contrast, with a brightly lit subject against a darker background, drawing the viewer’s eye exactly where you want it. It adds a sense of drama and intention to the shot, isolating a key moment from the surrounding chaos.
Finally, you must be aware of how the environment’s light sources interact with your frame. When using slow shutter speeds, the DJ’s lights will create strong trails. A common mistake is to have these light trails cut directly through a person’s head or face, which is distracting. To avoid this, be mindful of your position relative to the lights. Sometimes, a single step to the left or right is all it takes to recompose the light trails so they frame your subject or add energy to the background without being disruptive. The best practice is to first dial in your settings (aperture, ISO, shutter speed) to get the light trails looking how you want them, then add and adjust your flash power to properly expose your subject within that pre-designed canvas of light.
Ultimately, capturing dance floor energy is a mindset shift. It requires you to let go of technical perfection and instead tune into the kinetic rhythm of the room. By combining intentional motion, participatory framing, and a thoughtful balance of light, you can create images that do more than just document an event—they transport the viewer back to the heart of the celebration, allowing them to feel the pulse of the music and the collective joy of the moment. Start by experimenting with just one of these techniques at your next wedding, and build from there.