
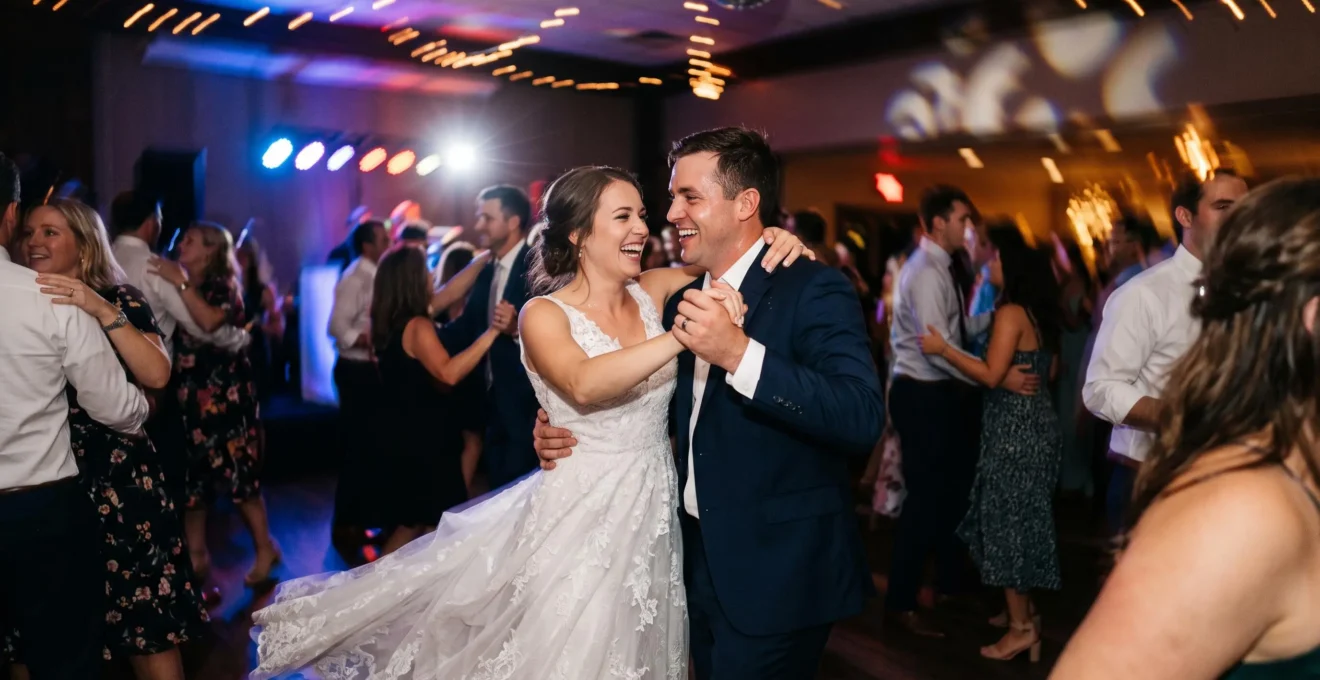
The core problem with flat dance floor photos isn’t your gear; it’s capturing moments statically instead of kinetically.
- Instead of freezing action with high shutter speeds, use intentional motion blur to convey energy and movement.
- Anticipate peak action like a sports photographer to capture the apex of a jump or spin, not just the moments before or after.
Recommendation: Start by mastering slow-sync flash and rear-curtain sync. These two techniques are the fastest way to create photos that feel as dynamic as the moments they capture.
Your action shots from the wedding dance floor feel flat. Despite the chaos, the laughter, and the wild moves, the final images look static, awkwardly cropped, and devoid of the electric energy you witnessed. The common advice is to crank up the shutter speed to freeze motion and use a flash to blast away the darkness. But this approach often kills the very soul of the moment, producing sharp but lifeless figures against a black, cavernous background. You’re left with a technically correct photo that fails to tell the story of the celebration.
What if the solution wasn’t to fight the motion, but to embrace it? What if the key to dynamic imagery wasn’t found in traditional portraiture rules, but in the playbook of sports photography? As a photographer trained to capture the peak of physical expression, I can tell you that energy isn’t just about sharpness; it’s about anticipation, flow, and the deliberate use of motion. It’s about capturing the feeling of the music, not just the sight of the dancers.
This guide will shift your mindset. We will move beyond simply documenting who was on the dance floor and instead focus on capturing the kinetic signature of the event. You’ll learn to see the dance floor not as a dark room full of people, but as an arena of controlled chaos, filled with moments of peak action waiting to be framed. We’ll break down how to use intentional blur, master advanced flash techniques, and crop with the awareness of a movement expert, transforming your static shots into visually exciting photographs that make the viewer feel the beat.
This article provides a complete framework for transforming your wedding reception photography. The following sections break down the specific techniques and mindset shifts required to capture true dance floor energy.
Summary: A Guide to Capturing Dynamic Wedding Dance Floor Photography
- Why Intentional Motion Blur at 1/15s Creates More Energetic Dance Photos Than Frozen 1/500s Sharpness
- How to Master Panning Technique for Sharp Subjects Against Blurred Backgrounds During Wedding Sparkler Exits
- Tight Crop on Dancers or Wide Environmental Framing: Which Shows More Energy on Wedding Dance Floors
- The Awkward Cropping Mistake That Amputates Limbs During Dynamic Wedding Dance Floor Moments
- When to Press the Shutter During Dynamic Action: Before, During, or After Peak Movement
- How to Combine Motion Blur With Sharp Subjects Using Slow-Sync Flash on Dance Floors
- Why Rear-Curtain Flash Sync Creates Better Sparkler Exit Photos Than Front-Curtain or Ambient-Only
- How to Photograph Dance Floor Energy That Makes Viewers Feel the Music and Movement
Why Intentional Motion Blur at 1/15s Creates More Energetic Dance Photos Than Frozen 1/500s Sharpness
The reflex to fight a dark dance floor is to use a fast shutter speed (like 1/500s) to freeze every movement. While this guarantees a sharp subject, it also sterilizes the scene, stripping it of its inherent energy. The result is a static figure suspended in a black void, disconnected from the music and motion. The secret to conveying energy is to let the camera “see” the movement. This is achieved through a technique called shutter dragging, where a slow shutter speed is combined with a flash.
By dropping your shutter speed, you allow the ambient light—the colorful DJ lights, the warm uplighting, the disco ball reflections—to paint onto your sensor. This creates beautiful, fluid light trails and a sense of a vibrant, living environment. The flash then fires for a fraction of a second to freeze your primary subject, creating a powerful juxtaposition: a sharp, clear person immersed in a world of controlled chaos. This technique tells a more complete story, one of both individual joy and collective energy.
The sweet spot for this effect often lies in a specific range. In fact, an analysis of professional work shows that shutter speeds between 1/15s and 1/60s are commonly used to capture a soft, dynamic trail without completely losing the subject’s form. A speed of 1/15s will create more dramatic blur, while 1/60s offers a more subtle sense of motion. The choice depends on the “energy signature” of the dance floor; a wild mosh pit calls for a different approach than a gentle slow dance.
How to Master Panning Technique for Sharp Subjects Against Blurred Backgrounds During Wedding Sparkler Exits
The panning technique, a staple of motorsports photography, is perfectly suited for dynamic wedding moments like sparkler exits. The goal is to move your camera in sync with your moving subject (the couple), using a slow shutter speed. If done correctly, the subject remains relatively sharp while the background and foreground (the sparklers and guests) streak into beautiful lines of motion. This isolates the couple and powerfully conveys their forward momentum as they embark on their new journey.
Mastering the pan requires practice and a specific setup. First, position yourself parallel to the couple’s expected path. As they begin to move, track them smoothly in your viewfinder, keeping your focus point on them. The key is to press the shutter button while you are still moving the camera and, crucially, to follow through with the motion even after the shutter closes. Any sudden stop will jerk the camera and ruin the effect. Using burst mode is highly recommended, as it increases your chances of nailing at least one perfectly sharp frame within the sequence.
The shutter speed is the most critical variable. It needs to be slow enough to register blur but fast enough to maintain some definition in the subject. Experts in the field have found that panning often requires adjusting shutter speed to the subject’s pace, suggesting around 1/8s for slow walkers and up to 1/60s for a faster-paced exit. Start around 1/30s and adjust based on the couple’s speed and the amount of blur you want to achieve. Continuous autofocus (AF-C or AI Servo) is your best friend here, as it will actively track the couple as they move toward you or across your frame.
Tight Crop on Dancers or Wide Environmental Framing: Which Shows More Energy on Wedding Dance Floors
The debate between a tight crop and a wide environmental shot is not about right or wrong, but about defining what kind of energy you want to convey. A wide shot showcases the collective energy of the room. It places the subjects within the context of the celebration, showing a packed dance floor, the flashing lights, and the shared joy of the crowd. This composition is powerful for establishing the scene and telling the story of the party as a whole. It answers the question, “How did the celebration feel?”
Conversely, a tight crop focuses on individual energy and emotion. By getting close and filling the frame with a single dancer or a laughing pair, you eliminate distractions and amplify the intensity of their personal experience. This approach turns a face into a landscape of emotion—the crinkle of an eye, a bead of sweat, a wide-open laugh. It’s an intimate and powerful way to make the viewer feel like they are right there in the moment, sharing a personal connection with the subject. This framing answers the question, “How did this person feel?”
As a case study on emotional storytelling reveals, framing choices directly control the viewer’s experience. An analysis by Orion Photo Group discusses how a wide shot of a groom’s first look diluted his reaction, but cropping tightly onto his expression made the image far more powerful. The same principle applies to dance floor energy. Cropping out the unnecessary surroundings concentrates the emotional and kinetic force of your subject into a single, potent frame. The key is to decide your narrative intent *before* you shoot: are you telling the story of the room or the story of the person?
The Awkward Cropping Mistake That Amputates Limbs During Dynamic Wedding Dance Floor Moments
One of the most common and jarring errors in action photography is “limb amputation”—cropping a subject’s arms, legs, hands, or feet at an awkward point, typically a joint. Cropping through a knee, elbow, or wrist creates a visual disconnect that feels uncomfortable and amateurish. On a dynamic dance floor, with limbs flying in all directions, this mistake is easy to make. It breaks the kinetic flow of the body and disrupts the viewer’s ability to interpret the gesture and movement.
The solution is limb-aware cropping. The general rule is to avoid cropping at any natural bending point. If you must crop a limb, do it mid-way between joints, for example, on the forearm or thigh. A more advanced approach, however, is to think about the frame’s edges as active compositional tools, not passive boundaries. A hand entering the side of the frame can add tension and mystery, suggesting a larger scene. A foot cropped at the very bottom can ground the image. The goal is to make every crop feel intentional, either by including the entire limb or by using its partial inclusion to enhance the composition.
Cropping outside the camera is for farmers.
– Professional photography maxim, Cropping—An Element of Composition, SunBounce Pro
This old maxim highlights the importance of getting the composition right in-camera. On a fast-moving dance floor, this means anticipating movement and framing wider than you think you need, giving you a safe buffer for cropping in post-production without accidentally amputating a key gesture.
Action Plan: Auditing Your Frames for Dynamic Composition
- Joints Check: In your viewfinder and during culling, actively look for frames that cut through wrists, elbows, knees, or ankles. Is the crop intentional?
- Edge Scan: Are distracting or unintentional elements creeping in from the frame’s edges? Use them as active tools or crop them out entirely.
- Focal Point Clarity: Does your crop guide the viewer’s eye directly to the single most important element of the action?
- Breathing Room: Is there negative space in the direction of the movement? Give your subject room to move *into* the frame.
- Intentionality Review: Look at each cropped limb. Ask yourself: does this partial inclusion add to the story or does it feel like a mistake?
When to Press the Shutter During Dynamic Action: Before, During, or After Peak Movement
In sports, the most powerful image is rarely the one taken when an athlete is at rest. It is the moment of maximum exertion, the apex of a jump, the instant of impact. This is what the legendary photographer Henri Cartier-Bresson called “the decisive moment.” On a wedding dance floor, the same principle applies. The most energetic and emotionally resonant photos are captured at the peak of the action, not the moments leading up to it or winding down from it.
To capture this, you must learn peak action anticipation. Don’t just react to what you see; predict what’s about to happen. Watch the dancers. Is someone crouching down? They’re about to jump. Is a couple spinning? Anticipate the moment they face you, laughing. Is someone about to do the worm? Get low and be ready for the moment their body arcs off the floor. Pressing the shutter just *before* the peak ensures your camera’s lag doesn’t cause you to miss the apex. Using burst mode here is a safety net, but your primary skill is learning to read body language and predict the flow of movement.
This image perfectly illustrates the concept of anticipation. The subject is coiled, muscles tensed, caught in the split second just before the leap. This is the moment a sports photographer lives for—not the jump itself, but the explosive potential right before it. Framing this anticipation creates a tension that is often more powerful than the action that follows.
As Cartier-Bresson himself famously stated, his philosophy was about finding the one moment that held the entire story. In his own words, as documented by Shutter Muse, he believed “There is nothing in this world that does not have a decisive moment.” Your job on the dance floor is to hunt for that moment—the peak of the laugh, the height of the jump, the climax of the spin. That is where the energy lives.
How to Combine Motion Blur With Sharp Subjects Using Slow-Sync Flash on Dance Floors
Slow-sync flash is the technical name for the “shutter drag” technique we’ve discussed. It instructs your camera to balance for two different exposures in one shot: a long exposure for the ambient light (creating motion blur) and a brief, powerful exposure from the flash (freezing the subject). This is the key to creating images that have a sharp focal point within a sea of beautiful, chaotic light and movement. It’s the ultimate tool for capturing the energy signature of the dance floor.
This abstract image shows the effect at a micro level. The flash has frozen the crisp texture of the fabric, while the slow shutter speed has allowed the background lights to streak past in a soft, colorful blur. This combination of sharpness and motion in a single frame is what makes the technique so visually compelling.
A creative variation on this is the “camera twist” technique. According to a case study from SLR Lounge, this involves using a slow shutter speed with a direct flash while physically twisting the camera during the exposure. The flash freezes the subject in the center, while the twisting motion creates dramatic circular light streaks at the frame’s edges. This adds an incredible layer of dynamic interest and is a perfect way to inject energy into an otherwise static scene. The key is to experiment: twist, zoom, or whip the camera during the long exposure to “paint” with the ambient light.
To execute this with more control, use off-camera flash. Placing one or two flashes on light stands around the dance floor allows you to sculpt your subjects with directional light, creating depth and dimension that on-camera flash can’t replicate. A common setup involves placing a gridded flash behind the subject for a dramatic rim light and another as a main light from the side, effectively separating them from the beautifully blurred background.
Why Rear-Curtain Flash Sync Creates Better Sparkler Exit Photos Than Front-Curtain or Ambient-Only
When using a slow shutter speed to capture motion trails, you have two main flash sync options: front-curtain and rear-curtain. Front-curtain sync (the default on most cameras) fires the flash at the *beginning* of the exposure. Rear-curtain sync fires the flash at the very *end*. For a moving subject like a couple during a sparkler exit, this choice is critical.
With front-curtain sync, the couple is frozen by the flash first, and then the light trails from the sparklers are recorded as they move forward. This results in the motion blur appearing *in front* of the couple, making it look like they are walking backward or being overtaken by the light. It’s an unnatural and often confusing effect. Rear-curtain sync solves this problem. The camera’s shutter opens, records the ambient light and the streaking sparkler trails as the couple moves, and then—just before the shutter closes—the flash fires, freezing them sharply at the end of their motion. This correctly places the light trails behind them, creating a natural and dynamic sense of forward movement.
This principle is confirmed by photographers in the field. In a discussion about glow stick exits, which use the same motion principles, photographer Nelya states her preference clearly: I use a slow shutter to capture the motion of the waving glow sticks, then set rear curtain sync to freeze the couple only after all the blur has been recorded.
This avoids any accidental blur crossing their faces and preserves the clean, sharp moment of their expression, framed by the energy of the exit.
This image is a perfect example of rear-curtain sync in action. The couple is tack-sharp, their joy perfectly captured, while the golden trails of the sparklers stream elegantly behind them, visually telling the story of their journey through the tunnel of light. This effect is impossible to achieve with front-curtain sync or ambient light alone.
Key Takeaways
- Stop freezing action; use intentional motion blur (shutter drag) to convey the energy of the dance floor.
- Think like a sports photographer: anticipate the peak of the action to capture the most dynamic and emotional moments.
- Use rear-curtain sync for moving subjects like sparkler exits to place motion trails logically behind them.
How to Photograph Dance Floor Energy That Makes Viewers Feel the Music and Movement
Ultimately, capturing dance floor energy is less a technical exercise and more a philosophical one. The goal is not just to make a sharp, well-exposed photograph, but to create an image that resonates with the feeling of the moment. It’s about translating the sound of the music, the heat of the room, and the uninhibited joy of the dancers into a two-dimensional frame. To do this, you must become a participant, not just an observer.
Get off the periphery and onto the dance floor. Using a wide-angle lens up close forces you into the heart of the action, creating dynamic perspectives that make the viewer feel immersed. This proximity allows you to capture raw, unfiltered expressions and gestures that are lost from a distance. Combine this with the techniques we’ve discussed: drag your shutter to let the light dance, use off-camera flash to sculpt your subjects, and anticipate those peak moments of pure, unadulterated fun. Your camera is not a passive recording device; it is an active tool for interpreting energy.
Your framing, your timing, and your use of light all work together to define the energy signature of the photograph. Is the mood chaotic and wild? Use a tilted angle and a slow shutter twist. Is it elegant and romantic? Use a clean composition with soft, directional light. Every choice you make contributes to the final feeling of the image.
I like the photos to look the way things feel.
– Jeff Brummett, How To Use Shutter Drag For Wedding Reception Photos
This simple but profound statement is the ultimate guiding principle. The techniques in this guide—panning, shutter dragging, rear-curtain sync, and peak action anticipation—are not just tricks. They are tools to help you close the gap between what you see and what you feel. They allow you to move beyond simple documentation and become a true storyteller of the celebration’s kinetic soul.
Now that you have the playbook, the next step is practice. At your next wedding, challenge yourself to get on the dance floor and experiment with just one of these techniques. Start by mastering shutter drag and see how it immediately transforms the energy of your images.