
Many talented wedding photographers deliver galleries that feel strangely incomplete, ending on a flat note after the energy of the reception. This guide reframes the grand exit not as an afterthought, but as the essential final scene in a cinematic narrative. By mastering the art of the exit shot, you provide powerful narrative closure, transforming a good gallery into an unforgettable story and a more compelling business asset that justifies premium rates.
As a wedding storyteller, your mission is to capture the full arc of a couple’s day. You meticulously document the quiet anticipation of the morning, the emotional peak of the ceremony, and the joyous chaos of the reception. Yet, for many photographers, the story ends with a fade to black on the dance floor. The gallery trails off, leaving a subtle but tangible sense of incompleteness. This “anticlimactic gap” is a missed opportunity, a final chapter left unwritten.
The common advice is to get a few quick shots of the couple leaving, but this barely scratches the surface. The true challenge isn’t just being there; it’s about understanding the narrative function of the grand exit. It’s the resolution, the celebratory release of all the day’s emotion, the moment the protagonists ride off into the sunset. Without a powerful, deliberate closing image, the entire gallery—your meticulously crafted story—lacks a satisfying conclusion.
But what if the key wasn’t just to *document* the exit, but to *direct* it as the final scene of a film? This guide moves beyond basic technical tips to explore the grand exit as the cornerstone of narrative closure. We will deconstruct how to position yourself for the perfect shot, choose the most dramatic exit styles, and master the advanced lighting techniques that separate an amateur snapshot from a cinematic final frame. This approach will not only elevate your art but also your business, as a complete and compelling portfolio is what truly sets a premium photographer apart.
This article provides a complete framework for transforming your grand exit coverage from a source of stress into a signature element of your storytelling. Follow along as we explore the strategy, technique, and mindset needed to deliver galleries that feel truly finished.
Summary: Mastering the Grand Wedding Exit for a Powerful Gallery Finale
- Why Wedding Galleries Feel Incomplete Without a Strong Grand Exit Closing Image
- How to Position for Grand Exit Coverage Without Blocking the Couple’s Path or Guests’ Sightlines
- Sparkler Exits, Bubble Send-Offs or Vintage Car Departures: Which Exit Style Creates the Most Dramatic Images
- The Premature Pack-Up Mistake Where Photographers Miss Grand Exits Because Gear Is Already Stored
- When to Wait for Delayed Grand Exits and When to Recognise the Couple Won’t Actually Exit
- Why Rear-Curtain Flash Sync Creates Better Sparkler Exit Photos Than Front-Curtain or Ambient-Only
- How to Structure a Wedding Day Narrative Arc That Reads Like a Cinematic Love Story
- How to Build Compelling Wedding Day Storytelling From Preparation Through to Final Exit
Why Wedding Galleries Feel Incomplete Without a Strong Grand Exit Closing Image
A wedding gallery is more than a collection of photos; it’s a story with a beginning, a middle, and an end. When the final images trail off with generic dance floor shots, the narrative arc collapses. The viewer is left with a sense of “is that it?” This anticlimactic ending weakens the perceived value of the entire gallery. The closing image is your last chance to make an impression, the final word in the story you’ve spent all day telling. It should be a crescendo, not a quiet fade-out.
In a saturated market, differentiation is survival. Photographers who command premium rates do so not by competing on price, but by offering a distinctive, complete vision. A powerful exit shot becomes a key differentiator—a signature element that demonstrates your commitment to storytelling from the first detail shot to the very last moment of celebration. It proves you don’t just take pictures; you craft narratives. This final, epic shot is often the one that gets shared widely, acting as a powerful marketing tool that speaks to your ability to deliver a full, cinematic experience.
Case Study: The Business of a Better Ending
An industry analysis of the wedding photography market highlights a crucial survival strategy for experienced photographers. It found that those who succeed at premium rates do so by creating a deep and distinctive portfolio. This reinforces the idea that a powerful, unique closing image, like a grand exit shot, functions as a tangible business asset. It’s not just a memento for the couple; it’s a testament to a photographer’s ability to deliver a complete narrative, justifying a higher price point in a competitive field.
Ultimately, a strong closing image is about fulfilling the promise you make as a storyteller. It provides narrative closure, confirming that the day was not just a series of events but a complete, beautiful story. That feeling of satisfaction and finality is what elevates a gallery from a simple record to a cherished heirloom and a powerful portfolio piece.
How to Position for Grand Exit Coverage Without Blocking the Couple’s Path or Guests’ Sightlines
The grand exit is a moment of fast-moving, chaotic energy. For the photographer, it presents a significant logistical challenge: how to capture the couple’s joy head-on without tripping, blocking the guests’ view, or becoming an obstruction yourself. The key is proactive communication and establishing a clear, safe lane of movement for yourself. Your goal is to be a fluid part of the moment, not a stationary obstacle.
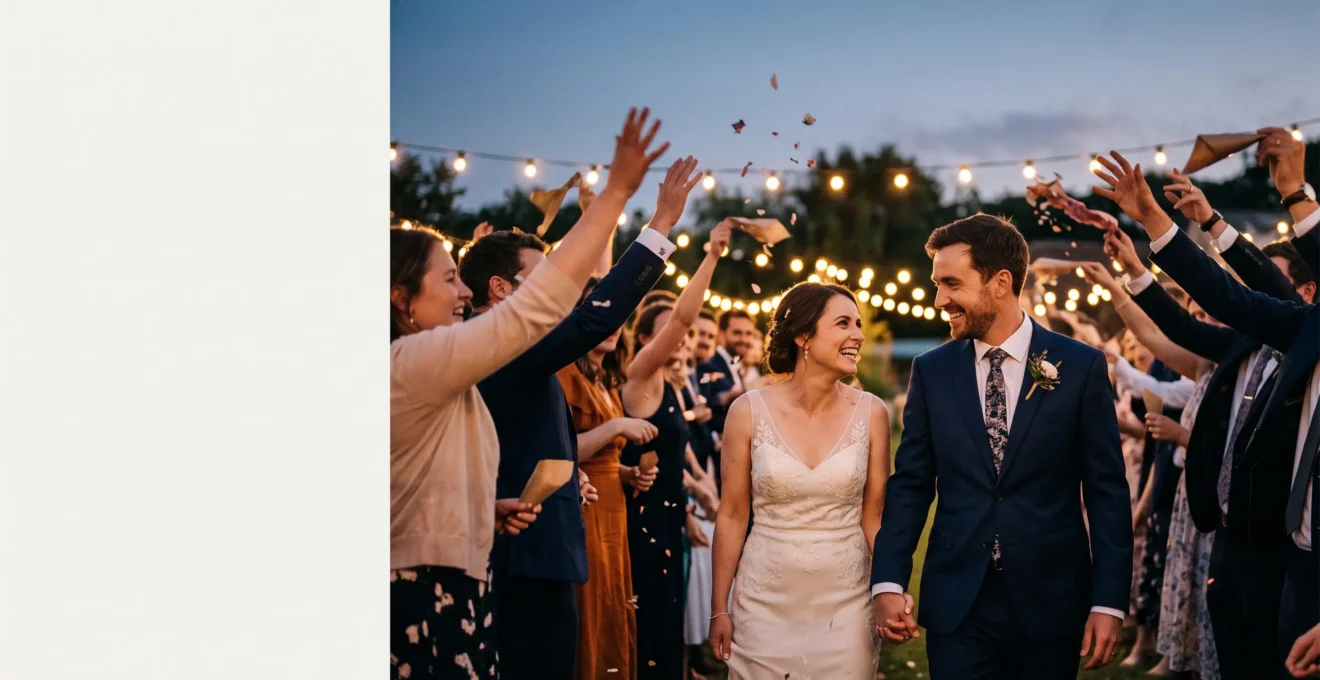
This photographer’s “safe zone” is a clear path you create for yourself to move within the exit line. Ideally, you should be walking backward in front of the couple, capturing their expressions as they move through the crowd. This requires coordination with the planner or DJ to ensure guests form two distinct lines, leaving a wide enough corridor for both the couple and you. This space is non-negotiable for achieving a clean, impactful shot. The image below illustrates the ideal outcome: a well-defined path that gives you the freedom to create.
As this visual demonstrates, a clear path is everything. To achieve this, you need a plan. The primary photographer often takes the lead, walking backward, while a second shooter can provide a crucial safety net and alternative angles. According to a professional second-shooter guide for wedding teams, the support photographer’s role is to deliberately capture what the lead cannot. For a grand exit, this means while you are focused on the couple’s faces, your second shooter should be positioned at the end of the line, capturing a wide, scene-setting shot and the reactions of guests, resulting in a much richer final sequence.
A successful exit shot is born from preparation. Politely but firmly directing guests and coordinating with your team are professional skills that are just as important as your camera settings. These actions ensure you get the shot safely and efficiently.
Sparkler Exits, Bubble Send-Offs or Vintage Car Departures: Which Exit Style Creates the Most Dramatic Images
Not all grand exits are created equal from a photographic perspective. The choice between sparklers, bubbles, confetti, or a vintage car departure has a massive impact on the mood, light quality, and logistical complexity of your final shot. As a storyteller, your role is to help guide the couple toward an option that not only fits their personality but also provides the raw ingredients for a stunning closing image. Each style offers a different kind of drama.
Sparklers offer a warm, golden, and dynamic light source that creates beautiful bokeh and reflects flatteringly on faces. However, they come with high logistical difficulty and significant safety risks, with many venues now restricting their use. Bubbles, on the other hand, are low-risk and create a whimsical, dreamy effect with soft, iridescent light, especially when backlit with flash. A vintage car departure feels classic and cinematic, but its photographic success is highly dependent on ambient light and your ability to light the scene effectively, making it a high-skill, low-participation option for guests.
Understanding these trade-offs is crucial for managing expectations and planning your technical approach. The following table breaks down the photogenic potential versus the inherent risks and difficulties of the most popular grand exit styles, providing a clear framework for discussion with your clients.
| Exit Style | Light Quality | Logistical Difficulty | Guest Participation | Safety / Venue Compliance Risk |
|---|---|---|---|---|
| Sparkler Exit | Warm, golden, highly reflective on faces | Medium (timing simultaneous lighting of all sparklers) | High | High — open flame; many venues restrict due to fire ordinances or wildfire bans |
| Bubble Send-Off | Soft, diffused; iridescent when backlit with flash | Low | High | Low-Medium — potential slip hazard from soap residue on hard flooring |
| Vintage Car Departure | Reflective/glossy, dependent on ambient light or headlights | High (coordinating vehicle timing, parking, driver logistics) | Low-Medium (guests mainly spectate rather than participate) | Low — minimal fire or slip risk, mostly a logistics/timing challenge |
Ultimately, the “best” exit is one that is well-planned and aligns with the venue’s rules and the couple’s comfort level. Your expertise lies in taking any of these scenarios and knowing how to manipulate the light and moment to create a dramatic final image. The data in the table, based on a comparative analysis of grand exit styles, serves as your strategic guide to making the most informed creative decision.
The Premature Pack-Up Mistake Where Photographers Miss Grand Exits Because Gear Is Already Stored
One of the most common and heartbreaking mistakes a wedding photographer can make is missing the grand exit because they’ve already started breaking down their gear. After a long 8, 10, or 12-hour day, the temptation to pack up non-essential lenses and lights as the party winds down is strong. This “premature pack-up” is a gamble that often results in a frantic, ill-equipped scramble when the couple decides on a spontaneous exit, or worse, missing the moment entirely.
The solution is a fundamental shift in mindset: the wedding is not over until the couple has left. The grand exit should be treated as a non-negotiable, scheduled event, not a possible bonus. This means communicating with the couple and the planner to have a firm exit time on the timeline and keeping your essential exit kit—a wide lens, a fast prime, and your off-camera flash setup—on your person until your contracted coverage is officially complete.
Case Study: Formalizing the Exit as a Timeline Checkpoint
An effective strategy is to formalize the exit within the wedding day schedule. For instance, a sample wedding photography timeline demonstrates this by explicitly scheduling a dedicated slot: “10:30 PM: Sparkler exit” followed immediately by “10:45 PM: Photo coverage ends.” This simple act of making the grand exit its own timeline checkpoint, rather than a floating event, fundamentally changes the dynamic. It prevents the photographer from packing away crucial gear before the final, critical moment happens, ensuring they are ready and equipped to capture the closing shot.
To avoid this mistake, you must treat the exit as the final peak of your coverage. Building in timeline safeguards and maintaining a state of readiness are professional disciplines that ensure you can deliver the complete story you were hired to tell, right up to the very last frame.
Action Plan: Safeguarding Against the Premature Pack-Up
- Confirm the Exit Plan: Before the reception starts, have a dedicated conversation with the couple or planner to confirm if a grand exit is planned and at what specific time.
- Build a Timeline Buffer: Add a 15-minute buffer after the scheduled exit time in your personal timeline to account for the inevitable delays of gathering guests.
- Designate Your “Exit Kit”: Mentally or physically set aside the minimal gear needed for the exit (e.g., one camera body, one wide/mid-range lens, one flash). All other gear can be packed, but this kit stays with you.
- Request a Final “Heads-Up”: Ask the planner, DJ, or a designated bridesmaid to give you a 10-minute warning before the exit is announced to guests.
- Adopt a “Last-Shot” Mindset: Reframe the end of the night. Your job isn’t done after the cake cutting; it’s done after you’ve captured the deliberately planned, memorable final image of the night.
When to Wait for Delayed Grand Exits and When to Recognise the Couple Won’t Actually Exit
You’ve reached the end of your contracted coverage time. The party is still going strong, but the “grand exit” on the timeline has come and gone. This is a common dilemma: do you wait, accruing unpaid overtime, or do you pack up and risk missing the shot? The professional’s answer is to have this conversation long before it becomes a problem by presenting two clear options to the couple during the planning phase: the staged exit or extended coverage.
The “mock” or staged exit is a brilliant solution that provides the epic photo without requiring the night to actually end. As wedding photographer Megan Rei notes, “mock exits are a more common thing than most people realize.” This involves gathering the wedding party and key family members for a “performance” of the exit an hour or so before your coverage ends. This gives you full control over the light and participants, ensuring a perfect shot while allowing the couple and their guests to return to the party.
Executing a staged exit is a matter of clear, confident direction:
- Select a Location: Choose a photogenic spot near the venue exit that is easily accessible.
- Gather the Key Players: Assemble the wedding party and immediate family. A smaller, enthusiastic group is better than a large, disorganized one.
- Direct the Action: Instruct the couple to walk, laugh, and interact as they move through the line. Cue them for a kiss or a dip at the end for a camera-ready climax.
- Create Energy: Have the gathered group cheer and celebrate loudly behind the couple to simulate the energy of a full send-off in the final photograph.
The alternative, for couples committed to a “real” end-of-night exit, is to build that expectation into the contract. A guide to wedding timelines advises couples to be prepared to add extra coverage hours specifically for this purpose. By presenting these two options upfront, you empower the client to make a choice that respects both their vision and your time. You are no longer waiting and hoping; you are executing a pre-agreed plan.
Why Rear-Curtain Flash Sync Creates Better Sparkler Exit Photos Than Front-Curtain or Ambient-Only
Photographing a sparkler exit is a quest to balance three competing elements: capturing the ambient glow of the sparklers, rendering their beautiful light trails, and freezing the couple in a sharp, well-lit portrait. Attempting this with ambient light alone often results in blurry subjects and camera shake. Using a standard (front-curtain) flash freezes the couple, but the flash fires at the *beginning* of the exposure, meaning any subsequent light trails from the sparklers will streak across their frozen faces, creating a messy, distracting image.
The solution is rear-curtain sync (also known as shutter drag). With this setting, the camera’s shutter opens for a relatively long duration (e.g., 1/8s), allowing the motion and light trails of the sparklers to be recorded as beautiful, flowing streaks of light. Then, just before the shutter closes, the flash fires. This burst of light freezes the couple cleanly at the *end* of their movement, with the elegant light trails appearing to flow naturally behind them. As photographer Mark Davidson states, this use of “direct flash will help freeze the motion and illuminate the couple.”
Case Study: Applying Rear-Curtain Sync Beyond Sparklers
The principle of rear-curtain sync is not limited to sparklers. A photographer documenting a glow stick wedding exit used the exact same technique to achieve stunning results. A slow shutter speed was used to capture the colourful motion trails of the waving glow sticks. The flash, set to rear-curtain sync, fired only at the very end of the exposure. This froze the couple’s faces and bodies cleanly, *after* all the light blur had been recorded. This technique masterfully avoids the risk of a glow stick trail blurring across the couple’s faces, a common problem with front-curtain sync in this scenario, proving the versatility of the technique.
Mastering rear-curtain sync is a technical leap that transforms your exit photos from a gamble into a predictable, cinematic success. Here are the steps to execute it:
- Set your camera to shutter drag or rear-curtain sync mode in your flash menu.
- Start with approximate settings: ISO 800, shutter speed between 1/6s and 1/8s, and an aperture of f/4 to f/5.6.
- Use your flash strategically: Point the flash directly at the guests, but at a reduced power (around 1/32 to 1/64), to add just enough fill light without overpowering the warm, ambient glow of the sparklers.
- Test your setup: Before the couple begins their walk, do a test shot of the scene to confirm you have the right balance between the ambient light trails and the flash-frozen subjects.
How to Structure a Wedding Day Narrative Arc That Reads Like a Cinematic Love Story
The most powerful wedding galleries are not just chronological; they are cinematic. They follow a classic three-act narrative structure that builds emotion and leads to a satisfying resolution. As the photographer and director, your job is to recognize and capture the key moments that define each act. Thinking in this narrative framework elevates your work from documentation to true storytelling.
Viewing the wedding day through this lens changes how you shoot. You’re no longer just ticking off a shot list; you’re consciously building a story, scene by scene. The grand exit, in this context, becomes the essential climax and resolution. It’s the final, triumphant scene that makes the entire story feel whole and complete. As one documentary wedding team, Ivory Fayre, demonstrates, blending techniques to create a portfolio that feels like a “directed love story” is a powerful way to stand out.
You can map this structure directly onto the wedding day, prioritizing your shots to serve the narrative:
- Act I (The Setup): This is the story of anticipation. Your focus is on quiet, intimate moments: the getting-ready shots, the intricate detail flat-lays of the dress and rings, the nervous excitement. These scenes establish the characters and the emotional stakes.
- Act II (The Climax & Confrontation): This is the emotional peak. It begins with the first look or the walk down the aisle and culminates in the ceremony, the vows, and the first kiss. Your coverage should focus on capturing the raw emotion—the tears, the laughter, and the profound connection between the couple.
- Act III (The Resolution): This is the celebration and release. It encompasses the reception highlights—the toasts, the first dance, the cake cutting. This act builds toward the final, cathartic moment: the grand exit. The exit shot serves as the definitive end, the closing of the narrative loop.
By intentionally structuring your coverage this way, you ensure, as photographer Rodney Bailey puts it, that “the wedding story feels complete from morning to night.” The gallery becomes more than a series of pretty pictures; it becomes a film, with your exit shot as the perfect final frame.
Key Takeaways
- The Exit is the Resolution: Treat the grand exit not as an optional add-on, but as the essential final chapter that provides narrative closure to your wedding story.
- Plan for Success: A great exit shot is 90% preparation. This includes coordinating with planners, managing guests, and formalizing the exit on the timeline to avoid premature pack-ups.
- Master the Technique: For dynamic exits like sparklers, using rear-curtain flash sync is the key technical skill that separates a blurry snapshot from a sharp, cinematic image with beautiful light trails.
How to Build Compelling Wedding Day Storytelling From Preparation Through to Final Exit
We’ve established that a wedding gallery is a story, and the grand exit is its crucial final scene. But building a compelling narrative is more than just remembering to take one last photo. It’s a philosophy that should inform your approach from the moment you arrive on the wedding day. It’s about consistently asking yourself: “What part of the story am I telling with this shot?”
This means seeing the detail shot of the bride’s grandmother’s locket not just as an object, but as a piece of backstory (Act I). It means capturing the groom’s tearful reaction during the vows not just as a moment, but as the emotional climax (Act II). And it means seeing the joyous, chaotic sparkler exit not just as the couple leaving, but as the triumphant resolution where the entire community celebrates their union (Act III).
Integrating this storytelling mindset requires a conscious shift. It means you are no longer just a photographer; you are a director, a narrator, and a historian of the day. The grand exit is simply the most visible proof of this philosophy. When you nail the exit shot, you are not just providing a picture; you are delivering on the promise of a complete, emotionally resonant story—a story that feels finished, satisfying, and unforgettable.
Take this narrative-focused approach to your next wedding. Before you even pick up your camera, map out the three acts of the day. Plan your exit shot not as a separate task, but as the deliberate, powerful conclusion to the story you are about to tell. Your clients—and your portfolio—will thank you for it.