
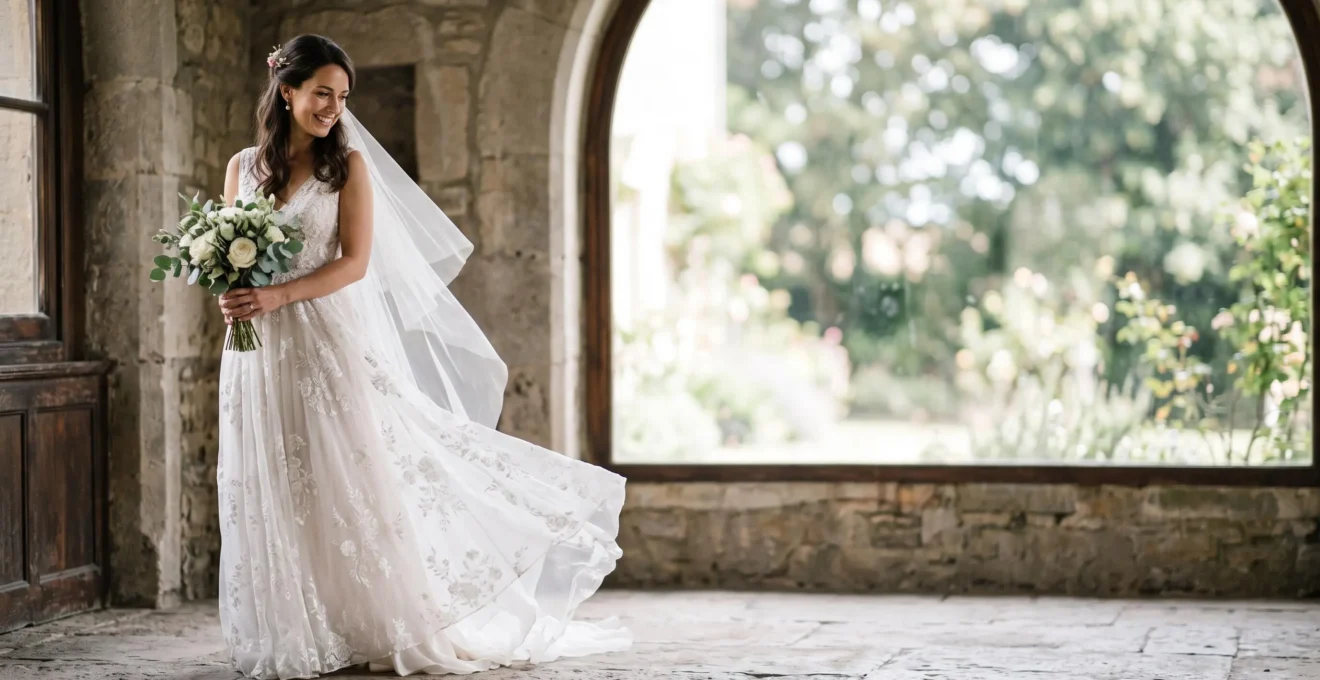
The difference between a good bridal portrait and an iconic one isn’t the camera or the lens; it’s a deliberate, reductive strategy focused on crafting a single, masterpiece image.
- Effective direction is about giving fewer, more meaningful prompts that evoke natural emotion, not a checklist of stiff poses.
- Mastering a single light source, whether it’s a soft window or open shade, creates a more powerful and timeless aesthetic than chasing complex setups.
Recommendation: On your next wedding, shift your goal from capturing 50 beautiful portraits to meticulously engineering one perfect, defining image that tells the entire story.
As a wedding photographer, you’ve been there. You deliver a gallery of 500, 700, even 1,000 stunningly captured, beautifully edited images. You’ve documented every detail, every tear, every laugh. Yet, weeks later, you see the bride’s social media profile picture is a slightly blurry smartphone snap taken by a cousin. The hard truth is that in a sea of images, most are destined for an album, rarely to be seen again. The client isn’t looking for hundreds of good photos; they are subconsciously searching for *one*—the signature image that perfectly encapsulates how they felt on that day.
The internet is saturated with generic advice: “find good light,” “use a shallow depth of field,” “capture the details.” These are the technical table stakes, the bare minimum for professional work. But they don’t explain why one photographer’s work ends up on a gallery wall and another’s remains in a digital folder. This isn’t about simply documenting the wedding dress or the floral arrangements; it’s about creating a piece of art that transcends the event itself. What if the key wasn’t a longer shot list, but a more focused, almost minimalist approach to the bridal portrait? What if perfection came not from adding more, but from a deep, intentional reduction?
This guide is for the photographer who has mastered the basics and is now reaching for mastery. We will move beyond the platitudes and deconstruct the philosophy and refined techniques required to elevate your work. We will explore the psychology behind the “one” iconic image, the art of reductive direction, the nuanced physics of light, and the precise timing that captures the emotional apex of the day. This is your masterclass in transforming a bridal portrait from a beautiful photograph into an unforgettable legacy.
This article provides a structured path to mastering the iconic bridal portrait. Each section builds upon the last, offering a complete framework for elevating your craft from proficient to exceptional. Discover the specific strategies that separate the good from the timeless.
Summary: A Masterclass in Crafting the Definitive Bridal Portrait
- Why Brides Display One Signature Portrait Prominently and Store the Other 49 in Albums
- How to Direct Brides Into Elegant Flattering Posture Without Creating Stiffness in Restrictive Gowns
- Soft Window Light Indoors or Natural Light Outdoors: Which Creates More Timeless Bridal Portrait Aesthetics
- The Over-Retouching Mistake That Makes Bridal Portraits Look Plastic Instead of Flawlessly Natural
- When to Schedule Bridal Portraits: Immediately After Makeup or After the Emotional First Look
- How to Direct Couples Into Flattering Poses When They Feel Awkward and Camera-Shy
- Why Some Portrait Light Feels Soft and Flattering While Other Light Feels Harsh and Unflattering
- How to Create Glamorous Couple Portraits That Look Like Vogue Without Losing Authentic Connection
Why Brides Display One Signature Portrait Prominently and Store the Other 49 in Albums
The concept of the “signature image” is rooted in simple human psychology. While a full wedding album tells a story, a single portrait must encapsulate an emotion. A bride doesn’t look at her defining portrait to remember the sequence of events; she looks at it to remember the pinnacle of how she felt: radiant, in love, and full of anticipation. This is why one image gets framed, printed on a canvas, and becomes the visual anchor for the entire memory of the wedding day, while the rest serve as supporting characters in the narrative. The goal is to consciously create this anchor.
The numbers back this up. While you may deliver hundreds of images, it’s a known industry reality that couples include a very limited selection in their final album—often between 10 and 60 photos in a standard 20-page wedding album. From this curated handful, only one or two will ever make it to a wall. This isn’t a failure on the photographer’s part; it’s a testament to the power of a single, iconic image. It’s the difference between a picture of a person in a wedding dress and a portrait of a bride. Your mission is to identify the potential for this image and engineer every element to bring it to life, separating it from the documentary shots like the first kiss or cake cutting.
This understanding fundamentally shifts your objective during the bridal portrait session. You are not just filling a quota. You are on a mission to create *the one*. This image must stand alone, conveying a complete emotional story without needing the context of the photos before or after it. It requires a different level of intention, moving beyond simply capturing what’s there to sculpting a moment of timeless elegance. To achieve this, some photographers even schedule a separate, stress-free session after the wedding day, purely dedicated to crafting this single masterpiece without the time constraints of the event itself.
As the visual here suggests, one image will always rise above the rest. It is chosen because it best reflects the bride’s idealized memory of herself on that day. It becomes her personal emblem of the entire experience. Knowing this, your focus sharpens. Every direction you give, every lighting choice you make, should be in service of creating this singular, powerful, and enduring piece of art.
This shift in mindset is the first and most critical step toward consistently creating the kind of portrait that defines a wedding.
How to Direct Brides Into Elegant Flattering Posture Without Creating Stiffness in Restrictive Gowns
The greatest enemy of an elegant bridal portrait is stiffness. A restrictive gown, combined with nerves and the pressure of being photographed, can cause a bride to look rigid and uncomfortable. The common mistake is to give a long list of complex instructions. The master’s approach is reductive direction: using minimal, high-impact prompts that create natural, flattering lines and, most importantly, allow the bride’s genuine emotion to surface. Forget telling her where to put every finger. Instead, give her an action or a thought to focus on.
A core principle, borrowed from fashion photography, is to avoid having the bride face the camera straight on. As one specialist notes, you should “Avoid posing a bride with her shoulders and hips squared to the camera; this shows the widest line of the waist.” Instead, have her turn her body about 45 degrees away from the camera and then turn her head back towards you. This simple move instantly creates a more dynamic and slimming silhouette. The focus then shifts from “posing” to gentle guidance. Ask her to slowly spin, allowing the dress to show its volume, or have her gently “kiss” her bouquet, which naturally softens her expression and brings attention to her eyes.
“Avoid posing a bride with her shoulders and hips squared to the camera; this shows the widest line of the waist.”
– Fashion photographer specializing in bridal fashion, Fstoppers
The key is to direct the emotion, not just the body. Instead of saying “smile,” try “think about the moment you first saw him today.” Instead of “look elegant,” say “take a deep breath and let your shoulders melt.” These prompts shift the bride’s focus from her physical self-consciousness to her internal, emotional state. The resulting posture is not a pose, but the physical manifestation of a feeling. This is how you capture authenticity within a beautifully structured frame, even when the gown itself is restrictive.
Your Action Plan: From Stiff to Stunning in 5 Steps
- Identify the “Best Side”: Before shooting, quickly assess which side of the dress and which profile of the bride is most compelling. Build your poses around this strength.
- Give an Action, Not a Pose: Instead of “put your hand on your hip,” try “gently run your hand down the side of your dress.” This creates movement and a more natural arm placement.
- Direct the Gaze: Use specific focal points. “Look just over my shoulder at the top of that tree,” or “Close your eyes and imagine you’re on your honeymoon.” This creates a more introspective and less “camera-aware” expression.
- Use the “Lean”: Have the bride put all her weight on her back foot and slightly push her hip away from the camera. This creates a classic S-curve that is universally flattering.
- Check for Tension: The hands, jaw, and shoulders are the first places tension appears. Give gentle reminders: “soften your fingers,” “part your lips slightly,” “let your shoulders drop.”
Ultimately, your role is to be a calm, confident guide who makes the bride forget she’s being posed, allowing her natural grace to shine through.
Soft Window Light Indoors or Natural Light Outdoors: Which Creates More Timeless Bridal Portrait Aesthetics
The choice between indoor window light and outdoor natural light is not a matter of one being “better,” but of understanding the distinct mood and aesthetic each one creates. A perfectionist doesn’t just find good light; they choose the *right* light for the intended emotion. The light itself becomes a character in the portrait, sculpting the bride and defining the atmosphere. Your decision here is a primary creative choice that will dictate the entire feel of the signature image.
Directional window light is the classic choice for a painterly, fine-art aesthetic. It mimics the light used by Renaissance masters, creating soft falloff and beautiful, subtle shadows that add depth and dimension to the face and gown. This light is predictable and controllable. By simply moving the bride closer to or further from the window, or by turning her relative to it, you can dramatically alter the look from soft and ethereal to dramatic and chiaroscuro. It’s perfectly suited for capturing quiet, introspective moments of anticipation before the ceremony begins.
Conversely, outdoor light offers a sense of scale, airiness, and context that is difficult to replicate indoors. Open shade on a bright day acts as a massive, natural softbox, providing even, flattering illumination that is ideal for showcasing the full sweep of a gown. Golden hour light, with its warm, glowing quality, is unparalleled for creating passionate, emotionally charged, and nostalgic portraits. However, outdoor light is less controllable and subject to the whims of weather and time. The key is to avoid harsh midday sun, which creates unflattering, deep shadows under the eyes and causes squinting.
The best photographers have a clear vision for the portrait before they even pick a location. They are making a conscious choice based on the story they want to tell. The following table breaks down the decision-making process, allowing you to choose your light source with intention.
| Light Source | Mood Created | Best Suited For | Key Consideration |
|---|---|---|---|
| Directional Window Light (Indoor) | Dramatic, romantic, painterly fine-art feel | Introspective, quiet-anticipation portraits | Predictable and controllable, but requires proximity to the window for soft falloff |
| Open Shade / Overcast (Outdoor) | Soft, flattering, even illumination like a natural softbox | Epic, airy, romantic outdoor portraits | Avoid harsh midday sun which creates deep eye shadows and squinting |
| Golden Hour (Outdoor) | Warm, glowing, nostalgic | Passionate, emotionally charged portraits | Narrow time window before sunset; requires precise timing |
Choosing your light is not a technical task; it is the first brushstroke of your masterpiece. Whether you opt for the quiet drama of a window or the epic romance of the outdoors, do it with purpose.
The Over-Retouching Mistake That Makes Bridal Portraits Look Plastic Instead of Flawlessly Natural
In the quest for a “flawless” bridal portrait, many photographers fall into the trap of over-retouching. They obliterate skin texture, creating a “plastic” look that is both unnatural and, ultimately, unflattering. The goal of world-class retouching is not to erase reality but to enhance it. It’s about digital fidelity: maintaining the believability and life in the skin while subtly addressing temporary blemishes or distracting elements. A bride wants to look like the best version of herself, not a different person entirely.
The most common mistake is the overuse of global “smoothing” or “softening” sliders and plugins. These tools don’t discriminate, flattening the beautiful, subtle textures of the skin along with the imperfections. A truly masterful retouch involves more precise techniques, such as frequency separation. This method allows you to separate the texture (fine lines, pores) from the color and tone (redness, blotches) of the skin. You can then address color issues without destroying the essential texture that makes skin look like skin. It’s a more time-consuming process, but it is the single biggest differentiator between amateur and high-end portrait retouching.
You should aim to remove only what is temporary. Blemishes that appeared due to wedding-day stress? Remove them. Dark circles from a sleepless night? Soften them. But permanent features like freckles, moles (unless requested), or the fine lines around a joyful smile? These are part of the person and should be preserved. The goal is to create an image that looks like it’s been captured with perfect light and makeup, not one that has been heavily manipulated in post-production. The best retouch is the one nobody notices.
Look closely at the image above. The skin isn’t a flat, textureless surface. You can see the subtle, beautiful reality of its structure. This is what you must aim to preserve. When a bride looks at her portrait in ten years, she should see herself, not a fleeting trend in editing software. Your job is to clean the canvas, not paint a new face. This principle of enhancing, not erasing, is the soul of timeless portraiture.
Treat skin with the respect it deserves, and your portraits will possess a lifelike quality that stands the test of time.
When to Schedule Bridal Portraits: Immediately After Makeup or After the Emotional First Look
The timing of the bridal portrait session is a critical strategic decision that has a profound impact on the final image. There are two primary schools of thought, each with its own distinct advantages: shooting immediately after hair and makeup are complete, or shooting after the emotional peak of a “first look.” The choice you guide your client toward will determine whether the signature portrait is one of pristine perfection or one of profound emotional connection.
Shooting right after the bride is ready offers one major benefit: peak freshness. The makeup is flawless, every hair is in place, and the dress is untouched. This is the moment of maximum “perfection” in the traditional sense. It’s a controlled environment, free from the wind, tears, or enthusiastic hugs that will inevitably come later. This timing is ideal for capturing a very clean, poised, and fashion-oriented portrait. The bride is a pristine canvas, and the mood is one of quiet, elegant anticipation. However, the emotion can sometimes be more reserved, as the full weight of the day has yet to unfold.
On the other hand, scheduling the portraits after a “first look” taps into a powerful emotional current. The trend of couples seeing each other before the ceremony has become increasingly popular, with a 2023 study confirming that 56% of couples now opt for a first look. This moment is often the most private and emotionally charged of the entire day. Capturing the bridal portrait in the immediate aftermath of this encounter means you are photographing a bride whose face is alive with genuine, palpable emotion. The “perfect” makeup might now be streaked with happy tears, but the expression is undeniably real and deeply resonant. As one couple reflected on their choice:
“Our time together during the ‘first look’, when we spoke about what we loved most about each other.”
– A couple’s reflection, Roy The Photographer
This timing prioritizes emotional authenticity over cosmetic perfection. A skilled photographer can manage this moment, keeping it private and budgeting just 10-15 minutes to harness that raw emotion into a stunning portrait. The decision ultimately comes down to the primary goal: do you want to capture the bride as a perfect vision, or as a woman overwhelmed with love? The best photographers discuss these options with their clients to align the session’s timing with the desired emotional outcome.
By planning the timing with intention, you can ensure you are in the right place at the right time to capture the exact feeling that will define the signature image.
How to Direct Couples Into Flattering Poses When They Feel Awkward and Camera-Shy
Even the most photogenic bride can feel awkward when posed with her partner, especially if he is camera-shy. The key to dissolving this awkwardness is to shift from static “posing” to interactive prompting. You are no longer just a photographer; you are a director of moments. Instead of arranging them like mannequins, give them a simple task to perform together. This redirects their focus from the camera to each other, allowing their natural connection to emerge.
Simple prompts can work wonders. Ask them to walk slowly away from you while looking at each other. This captures a beautiful, natural profile and interaction. A powerful technique is to have them stand face-to-face, foreheads almost touching, and ask the groom to whisper what he’s most looking forward to in their life together. This will almost invariably elicit a genuine, soft smile from the bride that you cannot “pose.” The goal is to create a private bubble for them, where you are just an observer on the periphery.
Another strategy is to build on their natural physical language. Are they natural huggers? Use an embrace as your starting point. Then, refine it. Ask him to wrap his arms around her from behind and whisper in her ear. This creates intimacy and security. You can also introduce a sense of playfulness and elegance. As one guide suggests, “The groom dips the bride as they share a kiss, adding a sense of playfulness and elegance to the shot.” The dip is an action, not a pose, and it creates a dynamic, high-energy moment that feels glamorous and authentic.
Your energy is also a critical factor. If you are calm, confident, and encouraging, they will relax. Talk to them continuously, not about the camera, but about them. Ask about their story, make them laugh, and remind them that this is their moment. The more you can make them forget they are in a photoshoot, the more genuine and flattering their “poses” will become. You are capturing the space between them—their connection, their history, and their future.
By focusing on interaction over instruction, you can transform awkwardness into authentic, beautiful portraits that reflect the true nature of their relationship.
Why Some Portrait Light Feels Soft and Flattering While Other Light Feels Harsh and Unflattering
The distinction between “soft” and “harsh” light is not subjective; it’s a matter of physics. The perceived softness of a light source is determined by its size relative to the subject. A large light source creates soft, wrapping light with smooth, subtle transitions between highlights and shadows. A small, distant light source creates harsh light with sharp, defined, and often deep shadows. The sun, despite being enormous, is so far away that it acts as a small, hard light source, creating the harsh shadows we see at midday.
This is why an overcast sky is a portrait photographer’s best friend. The clouds act as a giant diffusion panel, turning the entire sky into a massive, soft light source that illuminates the subject from all directions, filling in shadows and creating a flattering, even look. Similarly, open shade works by blocking the hard, direct sun and using the ambient light from the clear sky or reflected light from surroundings as the main, large light source. Window light is soft because the window itself becomes the light source; the larger the window, the softer the light.
Understanding this core principle allows you to move beyond simply “finding” good light to actively *creating* it. If you’re indoors, don’t just place the bride anywhere. Place her near the largest window and turn off any competing overhead lights, which are small, hard sources that create strange color casts and unflattering “raccoon eye” shadows. This is especially crucial when considering the massive difference in light intensity, where typical indoor spaces have 100-500 lux compared to over 10,000 lux outdoors. This gap means you must be deliberate with your indoor lighting strategy.
A practical lighting plan prioritizes quality over quantity. Your default should always be to seek out or create a large, soft light source. This means defaulting to window light indoors, open shade outdoors, and capitalizing on the warm, soft light of the golden hour whenever possible. Only when these natural sources are insufficient should you consider adding artificial light, and even then, the goal is often to use a flash with a large modifier (like an umbrella or softbox) to mimic the qualities of a large, soft, natural source. The ability to see and shape light is what separates a technician from an artist.
By mastering the relationship between size, distance, and softness, you gain ultimate control over the mood and quality of your bridal portraits.
Key Takeaways
- Your primary goal is not a full gallery of good photos, but one single, iconic portrait that encapsulates the entire wedding’s emotion.
- Adopt “reductive direction”—use minimal, action-based prompts to elicit natural posture and genuine expression instead of creating stiffness with a list of poses.
- Master the physics of a single light source. Whether it’s a large window or open shade, understanding how to shape a large, soft light is the key to a timeless aesthetic.
How to Create Glamorous Couple Portraits That Look Like Vogue Without Losing Authentic Connection
Achieving a “Vogue-like” aesthetic in wedding photography is not about elaborate, over-styled scenes. It’s about borrowing principles from high-fashion editorials: strong composition, an emphasis on fabric and form, and the capture of quiet, “in-between” moments that feel more intimate and authentic than a forced pose. It’s a paradox: the most glamorous shots often feel the most understated. This approach elevates the portrait from a simple depiction of a couple to a timeless piece of fashion-inspired art.
The foundation of this style is a deep appreciation for the gown as a sculptural element. As a photographer, you must focus on the interplay of light and fabric, highlighting the texture of lace or the flow of silk. This is often achieved with strong directional light that skims across the material. The composition should be clean and powerful. Use leading lines from the architecture, create dramatic negative space, or frame the couple in a way that highlights their silhouette. The goal is to create a visually arresting image where the couple remains the emotional heart, even within a grander artistic framework.
A technique frequently used by fashion photographers is to capture the “un-posed” moments. Think of the quiet pause as the bride adjusts a strap, or the intimate glance exchanged as they fix the train of the dress. These are the moments that feel real and connected, yet can be framed with the elegance and drama of an editorial. This approach is exemplified by professionals who shoot for bridal designers. One such photographer, tasked with shooting over 100 gowns a season, applies these high-fashion principles to make each dress feel like a work of art.
Case Study: Applying Editorial Techniques to Bridal Photography
A fashion photographer who shoots seasonal catalogs for bridal designers has honed a specific set of techniques to make wedding gowns look as dynamic and elegant as high-fashion imagery. By photographing more than 100 gowns per season, they rely on angle-based posing tricks and a deep understanding of how fabric moves and catches light. Instead of standard wedding poses, they direct models using prompts developed for fashion campaigns, focusing on elongated lines, dynamic shapes, and a sense of effortless grace. This case demonstrates that applying an editorial mindset—prioritizing form, light, and composition—is the key to creating glamorous imagery that still feels authentic to the wedding context.
Your next wedding is not just an event; it’s a fashion shoot waiting to happen. By adopting this mindset and focusing on composition and authentic moments, you can create glamorous portraits that have the power and polish of a magazine cover, without sacrificing the genuine connection that makes them priceless.