
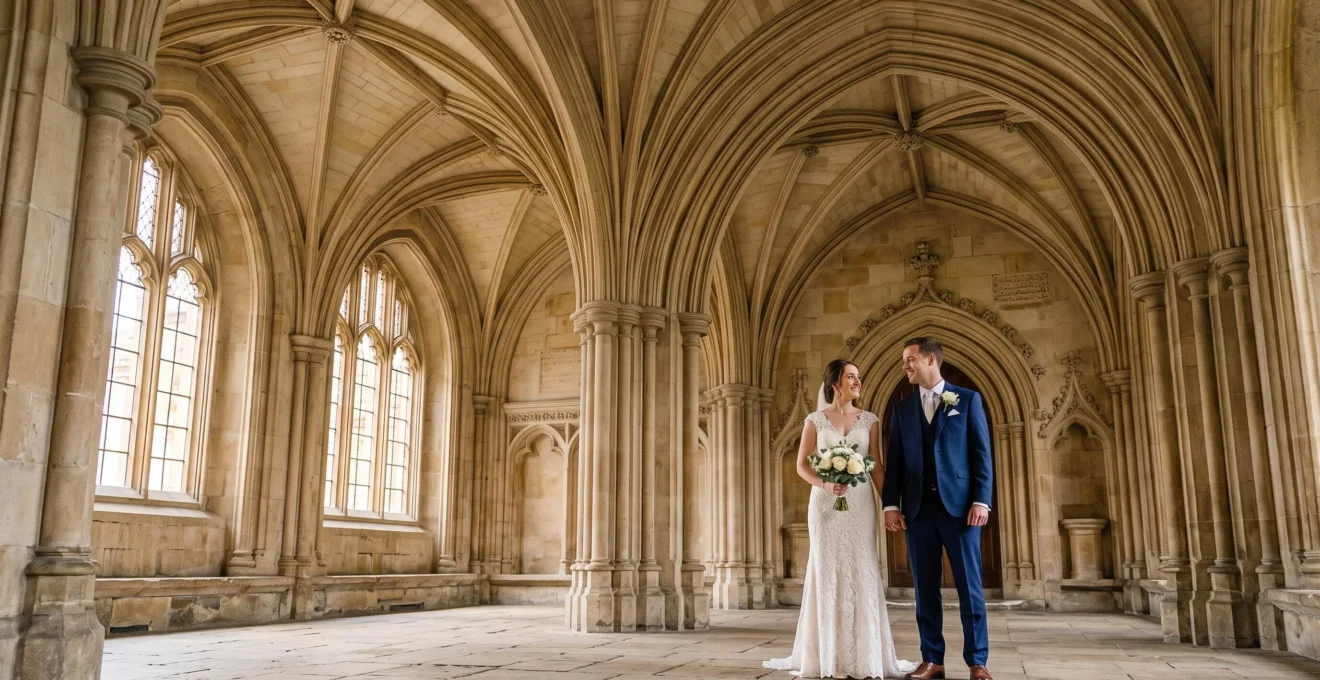
Distorted architectural photos are not an inevitable flaw of wide-angle lenses; they are a symptom of uncontrolled perspective that can be mastered.
- Achieve rectilinear purity by keeping the camera sensor perfectly parallel to the subject and finding the central axis of the scene.
- Choose your focal length (16mm, 24mm, 35mm) for its specific “focal character”—the inherent drama or naturalism it brings—not just its field of view.
Recommendation: Shift your mindset from reactively “fixing” distortion in post-production to proactively making intentional, in-camera decisions to control perspective like an architect.
For a wedding photographer, capturing the stunning architecture of a venue is as crucial as capturing the couple’s emotions. Yet, this is where many professionals face a frustrating paradox. You invest in a high-quality wide-angle lens to seize the grandeur of a ballroom or the majesty of a cathedral, only to find the resulting images warped and bent, with converging lines that make the space feel unstable and amateurish. The common advice is often to “fix it in post,” a reactive process that treats the lens as the problem.
This approach is fundamentally flawed. The issue is rarely the lens itself, but a misunderstanding of perspective. Instead of fighting distortion, what if you could control it? The secret lies in adopting the mindset of an architectural photographer, focusing on the physics of light and planes to achieve rectilinear purity. This isn’t about avoiding wide angles; it’s about mastering them. It’s the difference between accidentally creating distracting warped images and intentionally crafting powerful, expansive compositions.
This guide will deconstruct the principles of architectural photography and apply them to the dynamic environment of a wedding. We will move beyond simple corrections and delve into the proactive techniques of in-camera perspective control, the specific character of each focal length, and the creative decisions that separate a good shot from a breathtaking one. You will learn to command your wide-angle lens, making it an instrument of precision that captures not just the space, but its soul.
To navigate this technical and artistic journey, this article breaks down the essential concepts. We will explore everything from choosing the right focal length and keeping vertical lines perfectly straight to making deliberate creative choices about perspective in your final images.
Summary: How to Master Wide-Angle Lenses for Flawless Wedding Venue Photography
- 16mm, 24mm or 35mm: Which Wide-Angle Focal Length Captures Wedding Venue Architecture Best
- How to Keep Vertical Lines Straight When Photographing Tall Wedding Venue Architecture
- Wide Environmental Couple Portraits or Tight Intimate Framing: Which Suits Different Wedding Moments
- The Empty Space Mistake Where Wide-Angle Photos Feel Vacant Instead of Expansive
- When to Correct Wide-Angle Distortion in Post and When to Preserve Natural Perspective
- How to Use 16mm Ultra-Wide Lenses to Capture Venue Scale Without Distorting Architecture
- Low Camera Angles or Eye-Level Perspective: Which Better Conveys Vertical Architectural Scale
- How to Photograph Wedding Venue Grandeur That Showcases Architectural Scale and Splendour
16mm, 24mm or 35mm: Which Wide-Angle Focal Length Captures Wedding Venue Architecture Best
The first decision in mastering architectural shots is choosing the right tool, but “best” is not about a single focal length—it’s about understanding each lens’s unique character. While zoom lenses are workhorses, with a poll of 300 wedding photographers finding that the 24-70mm lens is used for nearly 68% of a wedding day’s photos, prime lenses or specific focal lengths within a zoom offer distinct personalities for architectural work. The choice between 16mm, 24mm, and 35mm is a choice between three different ways of interpreting a space.
A 35mm lens offers a natural, minimally distorted perspective that is close to human vision. It excels at capturing intimate moments with a clear sense of place, grounding the couple within the venue without overwhelming them. A 24mm lens strikes a balance, providing a wider field of view for environmental portraits and group shots that include significant architectural context. Its distortion is moderate and manageable, making it a versatile storyteller. The 16mm, or ultra-wide, is a specialist tool. It creates epic, immersive scenes, perfect for establishing shots of grand ceilings or entire ballrooms, but its strong edge distortion demands careful composition to avoid a “funhouse mirror” effect. Choosing the right lens is about matching its inherent distortion character to your narrative goal.
To make an informed decision, it’s crucial to understand the trade-offs. The following table breaks down how each focal length performs in terms of field of view, its ideal architectural application, and the nature of its distortion. This allows you to move from simply choosing the widest lens possible to selecting the precise focal length that tells the story you want to tell.
| Focal Length | Field of View | Best Architectural Use | Distortion Character |
|---|---|---|---|
| 16mm | Ultra-wide (~107°) | Epic establishing shots of grand ceilings and full ballroom context | Strong edge stretch; dramatic and immersive |
| 24mm | Wide (~84°) | Balanced environmental portraits with venue context | Moderate, controlled distortion |
| 35mm | Moderate wide (~63°) | Intimate moments with a natural sense of place | Minimal, near-realistic perspective |
Understanding these distinct personalities is the foundational step. Instead of defaulting to one lens, you can now intentionally select the focal length that best serves the specific architectural story you are telling in that moment.
How to Keep Vertical Lines Straight When Photographing Tall Wedding Venue Architecture
The single most defining characteristic of professional architectural photography is the control of vertical lines. When photographing tall structures like church steeples, grand columns, or high ceilings, the natural tendency is to tilt the camera upwards. This action is the primary cause of perspective distortion, or “keystoning,” where vertical lines appear to converge and fall inwards, making the building look like it’s about to topple over. Achieving rectilinear purity requires a disciplined, in-camera approach to counteract this effect.
The fundamental principle is to keep the camera’s sensor plane perfectly parallel to the architectural subject. This means your camera must be perfectly level and pointed at the horizontal center of your subject. Instead of tilting up, you should step back and, if necessary, use a longer focal length. If you cannot step back, the key is to find the “middle” of the building and shoot straight, even if it means cropping in post-production. For interiors, finding the central axis of the room and shooting from that point can create powerful symmetry that minimizes distortion.
Case Study: The Rectilinear Approach for a Reception Venue
For an Anglo-Ghanaian wedding reception, a photographer needed to capture the venue before guests arrived. A key feature was the high table with custom wording on the floor in front of it. Using a standard, tilted wide-angle approach would have warped the text and distorted the careful setup. By choosing a rectilinear wide-angle technique—keeping the camera perfectly level and centered—the photographer ensured all lines remained straight, preserving the integrity of the design and presenting the room with architectural accuracy.
Even with the best in-camera technique, some adjustments may be needed. Modern software offers powerful tools. Using the “Vertical” adjustment tool allows you to guide the software by tracing lines that should be parallel, forcing them into alignment. Combining automatic, level, and vertical corrections can often fix complex distortions at once. However, these tools work best when you’ve already done most of the work in-camera. The goal is to make minor tweaks, not to salvage a fundamentally flawed perspective.
Wide Environmental Couple Portraits or Tight Intimate Framing: Which Suits Different Wedding Moments
Once you’ve mastered the technical control of architecture, you must integrate the human element: the couple. The choice between a wide environmental portrait and a tight, intimate frame is a powerful narrative decision. As Tom K of Love & Lens Wedding Photography notes, seeing a professional with two lenses is often so they can capture “dramatically different looks of the same scene or moment.” This dual approach is critical when working with grand architecture.
A wide environmental portrait uses a lens like a 24mm or 35mm to place the couple as a small, significant element within a vast, breathtaking scene. This approach is perfect for moments that emphasize the scale and grandeur of the day—the first look in a soaring atrium, a walk across a historic bridge, or a dance in an empty ballroom. Here, the architecture is a co-star, telling a story of place and atmosphere. The key is to use leading lines, symmetry, and negative space within the architecture to guide the viewer’s eye to the couple, preventing them from getting lost in the frame.
Conversely, a tight intimate framing uses the architecture not as the subject, but as a compositional element to enhance closeness and emotion. This technique involves using architectural features like archways, doorways, or windows as natural frames within your photo. By shooting through these elements, you create layers and depth, isolating the couple from the wider world and focusing the viewer’s attention on their connection. This method can turn a grand, potentially impersonal space into a deeply personal and romantic setting.
As seen in the image above, using an archway to frame the couple creates a powerful sense of intimacy and focus. This technique doesn’t require a telephoto lens; it can be achieved with a 35mm or 50mm lens by positioning yourself correctly. The choice between wide and tight is not a technical one, but a storytelling one. Ask yourself: is this moment about the couple in the world, or is it about their world shrinking to just the two of them?
The Empty Space Mistake Where Wide-Angle Photos Feel Vacant Instead of Expansive
A common pitfall when using wide-angle lenses for architecture is creating images that feel empty and vacant rather than grand and expansive. This happens when the wide field of view is not managed with strong compositional elements. The lens simply captures too much uninteresting “negative space”—blank walls, empty floors, or cluttered, distracting foregrounds. The exaggerated perspective of a wide-angle lens, which visually extends the scene, must be harnessed intentionally to guide the eye, not just to show a lot of “stuff.”
To avoid the empty space mistake, every part of the frame must have a purpose. This is achieved by focusing on three key elements: a strong foreground, a clear midground, and a compelling background. A wide-angle lens gives you a unique opportunity to create a sense of depth by placing a compelling foreground element close to the camera. This could be an architectural detail, a floral arrangement, or even part of the venue’s texture. This element anchors the shot and provides an entry point for the viewer’s eye.
The midground and background must then work to continue this journey. Use the venue’s own leading lines—colonnades, pathways, or patterns on the floor—to draw the eye through the scene towards the main subject, whether it’s the head table, the altar, or the couple themselves. Instead of just stepping back to get everything in, try getting lower and closer to a foreground element. This exaggerates the perspective in a controlled, dynamic way, making the space feel vast but full of interest.
Study: Turning Distortion into Compositional Advantage
A tutorial by photographer Jiggie Alejandrino highlights how common ultra-wide-angle mistakes, like poor subject placement, lead to vacant frames. He demonstrates how to turn this potential weakness into a strength. By intentionally placing a subject or a strong compositional element in a specific part of the frame, you can use the lens’s natural distortion to create a dynamic visual path, transforming a potentially warped and empty shot into a powerful, cover-worthy image. The “distortion” becomes a tool for composition, not a problem to be fixed.
The goal is to fill the frame not with more objects, but with more compositional intent. A successful wide-angle shot is not about what you can fit in, but how you arrange what’s there to tell a story of scale and depth.
When to Correct Wide-Angle Distortion in Post and When to Preserve Natural Perspective
The final, critical decision in architectural wedding photography happens in post-production: do you correct the distortion, or do you embrace it? There is no single right answer; the choice hinges entirely on your creative intent. As one contributor to a LinkedIn Photography Community discussion noted, the best approach can be to embrace distortion “to infuse architectural photography with character and dynamism,” or to correct it for a “more straightforward representation.” This is the point where technical skill meets artistic vision.
Correct for rectilinear purity when the goal is to represent the architecture with precision, reverence, and accuracy. This is essential for classic, timeless shots where the venue’s design is a primary feature. If you are documenting a historic cathedral, a modern art gallery, or a perfectly symmetrical ballroom, correcting all perspective and lens distortion ensures the architect’s vision is respected. This creates a clean, stable, and professional look that conveys grandeur and stability. The image feels calm, deliberate, and true-to-life.
Conversely, preserve or even enhance distortion when your goal is to convey emotion, energy, and a subjective point of view. A 16mm lens used on a packed dance floor, for instance, uses its edge stretch and exaggerated perspective to create a sense of immersive, chaotic fun. Tilting the camera slightly during a dramatic portrait can create dynamic, converging lines that add a sense of unease or power. In these cases, the “distortion” is not a flaw; it is a narrative tool that communicates a feeling that a perfectly corrected image could not.
Your Action Plan: Selective Correction Workflow in Photoshop
- Preserve the Original: Always duplicate the background layer before any edits. This provides a safety net to protect your original architectural image.
- Automate the Basics: Navigate to Filter > Lens Correction. In the Auto Correction tab, the software can often fix barrel distortion automatically if it recognizes your camera and lens profile.
- Manual Fine-Tuning: For more complex images, use Filter > Adaptive Wide Angle. This powerful tool allows you to click and drag along lines that should be vertical or horizontal, snapping them into perfect alignment.
- Work Methodically: To maintain control and avoid creating new problems, follow a consistent order: fix lens (barrel) distortion first, then correct vertical perspective, and finally handle any edge or cropping issues.
The key is intentionality. A distorted image looks like a mistake when it feels accidental. A distorted image looks like art when it is clear that the photographer used that perspective to make the viewer feel something specific.
How to Use 16mm Ultra-Wide Lenses to Capture Venue Scale Without Distorting Architecture
The 16mm ultra-wide lens is a tool of extremes, capable of producing both awe-inspiring images of scale and disastrously distorted messes. Using it effectively for architecture requires a unique discipline that goes beyond standard wide-angle techniques. The primary goal is to leverage its immense field of view to convey the sheer size of a space while actively mitigating its aggressive perspective distortion, especially on key architectural lines.
The most effective strategy for taming a 16mm lens is to lean into symmetry and centrality. As shown in the image, placing the camera on the absolute central axis of a symmetrical space—like the main aisle of a church or the center of a ballroom—is paramount. By keeping the camera perfectly level and centered, the most prominent vertical and horizontal lines in the middle of the frame will remain straight. The distortion will be pushed to the edges, where it can be managed or becomes less noticeable.
Another key is to understand that with a 16mm lens, anything close to the camera will appear disproportionately large, and anything at the edges will be stretched. This means you must be incredibly careful with your foreground and subject placement. Avoid placing people or important round objects (like chandeliers) near the edges, as they will be warped unnaturally. Instead, use a small, distant subject—like the couple standing at the far end of the hall—to provide a sense of scale. This contrast between the vast space captured by the lens and the small human element creates a powerful feeling of grandeur.
An ultra-wide is not an everyday lens. It should be deployed strategically for specific situations. Some photographers carry a manual-focus ultra-wide prime, like a 10mm, reserving it only for venues they know are extremely constricted or for creating one or two signature “epic” shots. The limitations are real, and recognizing them is as important as knowing its uses. Think of the 16mm not as a wide-angle lens, but as a special-purpose “scale-creation” tool.
Low Camera Angles or Eye-Level Perspective: Which Better Conveys Vertical Architectural Scale
Beyond focal length, the height of your camera is a critical tool for manipulating the viewer’s perception of architectural scale. The choice between a low angle and an eye-level perspective is a decision about what kind of story you want to tell about the building’s presence. Each option creates a distinct psychological impact, making the architecture feel either dominant and imposing or grounded and approachable.
An eye-level perspective, where the camera is held at the height of a person standing in the space, creates a natural and relatable view. This is the most honest way to represent a space as it would be experienced by a guest. It’s an excellent choice for environmental portraits where the goal is to show the couple comfortably interacting within the venue. This perspective minimizes perspective distortion when kept level and produces a calm, stable, and realistic representation of the architecture. It invites the viewer in, making them feel as if they are present in the room.
A low camera angle, on the other hand, is a technique for dramatization. By placing the camera low to the ground and tilting it upwards, you intentionally create converging vertical lines that make the building soar. This perspective imbues the architecture with a sense of power, dominance, and majesty. It’s incredibly effective for exterior shots of tall towers or for making interior ceilings feel impossibly high. This technique makes the viewer feel small in the face of the structure’s grandeur. While it deliberately breaks the rule of keeping verticals straight, the resulting “distortion” is intentional and serves the purpose of emphasizing verticality.
Study: An Architect’s Photographer’s Perspective
Nicco Valenzuela, a professional architecture photographer, regularly shoots towering skyscrapers and vast cityscapes. He understands that a low angle is the primary tool for conveying the immense scale of these structures. He then applies these same principles from his professional work to his landscape photography, demonstrating that the choice of angle is a universal principle for communicating scale, whether the subject is a building or a mountain. The low angle is a deliberate choice to inspire awe.
The choice is not about right or wrong, but about effect. Do you want the viewer to feel like a guest inside the space (eye-level) or a subject in awe of it (low angle)? Master both, and you can control not just the look of the architecture, but the feeling it evokes.
Key Takeaways
- Mastering wide-angle lenses is about controlling perspective, not just avoiding distortion. Shift from a reactive to a proactive mindset.
- Every focal length has a “focal character.” Choose between 16mm, 24mm, and 35mm based on the specific narrative and level of drama you want to create.
- The ultimate decision to correct for rectilinear purity or preserve creative distortion in post-production must be a conscious artistic choice that serves your story.
How to Photograph Wedding Venue Grandeur That Showcases Architectural Scale and Splendour
Capturing the “grandeur” of a wedding venue is the ultimate goal, a synthesis of all the techniques discussed. It is more than just a wide shot; it’s about conveying a feeling of awe, splendour, and scale in a way that feels authentic to the wedding day. As the Honcho Editorial Team states, “Wide-angle lenses are crucial for capturing the grandeur of wedding venues, group shots, and dramatic environmental portraits.” But this is only part of the story. True grandeur is captured by building a visual narrative throughout the day, combining epic wide shots with intimate details.
A successful strategy for showcasing grandeur unfolds in chapters. During the morning preparations, a 24-35mm lens can capture bustling rooms and quiet, reflective moments, establishing the venue’s character before the main events. These are your foundational, scene-setting shots. During the ceremony and reception, the ultra-wide 16mm might come out for one or two epic establishing shots of the fully decorated space, but the 24mm will be the workhorse for capturing groups within the context of the grand architecture.
However, grandeur is not found only in width. It is also found in depth and detail. Juxtapose your expansive wide shots with close-up images of the venue’s unique splendour. Use a macro or portrait lens to capture the intricate carving on a column, the texture of a stone wall, or the gilded details on a ceiling. These shots tell a story of craftsmanship and history that a wide shot cannot. By creating a gallery that moves from the epic to the intimate—from the full ballroom to the detail on a single light fixture—you build a richer, more compelling narrative of the venue’s character.
Ultimately, photographing grandeur requires a holistic approach. It’s about pairing the right fixed-focal length lenses for portraits with versatile zooms for groups and action. It’s about knowing when to use a perfectly level, rectilinear wide shot to show the space, and when to use a macro lens to show its soul. The final gallery should feel like a guided tour, leading the viewer’s eye from the breathtaking whole to the exquisite parts that create it.
Your next step is to take this knowledge out into the field. At your next wedding, consciously practice these techniques: find the central axis, choose your focal length for its character, and make deliberate choices about perspective. This is how you transform your photography and capture the true splendour of any venue.