
The key to capturing venue grandeur isn’t wider lenses, but a reverent understanding of architectural space that translates its three-dimensional story into a powerful two-dimensional image.
- Effective grandeur shots provide essential narrative context that elevates a portfolio into the luxury tier.
- Mastering wide-angle lenses involves correcting distortion to honour the architect’s original lines, not just to fit everything in.
- The decision to include people is a narrative choice: they can act as a crucial unit of scale or be omitted to create a sense of pure, monumental architecture.
Recommendation: Shift your mindset from simply documenting a space to engaging in a visual dialogue with its architecture, using light, lines, and scale to evoke a feeling of awe.
As a photographer, you stand in a magnificent venue, humbled by its towering ceilings, sweeping staircases, and vast halls. You feel the awe, the sheer scale of the place. Yet, back in the editing suite, that feeling is gone. The images are flat. The grandeur is lost. This is a common frustration for wedding photographers tasked with capturing not just a couple’s love story, but also the epic stage on which it unfolds. The instinct is often to reach for the widest lens or to simply capture details, hoping they add up to a feeling of magnificence.
Most advice centres on technical quick-fixes: shoot empty rooms, find leading lines, use a 16mm lens. While these tips have their place, they often miss the fundamental point. They treat the venue as a passive backdrop rather than an active character in the wedding day narrative. Capturing architectural grandeur is not about a checklist of shots; it is an act of translation and reverence. It requires you to see as an architect, to feel the volume, to understand the flow of space, and to respect the integrity of the design.
But what if the true key to unlocking venue grandeur lies not in your gear, but in your philosophy? What if, by learning to honour the architectural magnificence, you could create images that do more than just show a place, but evoke its very soul? This guide moves beyond the surface-level tips to explore the principles of space, scale, and storytelling that separate a simple venue shot from a breathtaking work of architectural photography. We will explore the business case for these shots, the technical mastery required to execute them without distortion, and the artistic choices that bring a building to life.
This article provides a structured approach to mastering the art of venue photography. Below, you will find a roadmap to guide you through the core concepts, from the fundamental purpose of grandeur shots to the advanced techniques that will set your work apart.
Summary: A Photographer’s Guide to Capturing Monumental Venue Architecture
- Why Venue Grandeur Photos Provide Essential Context That Portrait-Only Galleries Lack
- How to Use 16mm Ultra-Wide Lenses to Capture Venue Scale Without Distorting Architecture
- Empty Architecture or Human-Scaled Grandeur: Which Better Conveys Wedding Venue Magnificence
- The Detail Obsession That Misses the Overall Venue Grandeur in Wedding Photography
- When to Photograph Venue Grandeur: Before Guest Arrival or During Reception Chaos
- Why Some Architectural Photos Convey Grand Scale While Others Make Large Spaces Feel Small
- How to Spot Natural Leading Lines in Wedding Venues From Hallways, Arches, and Symmetrical Architecture
- How to Convey Monumental Architectural Scale in Wedding Venue Photography
Why Venue Grandeur Photos Provide Essential Context That Portrait-Only Galleries Lack
A wedding gallery filled exclusively with beautiful portraits and intimate moments tells only half the story. Without the context of the venue, the narrative lacks a sense of place, a “where.” Grandeur shots anchor the event, providing the breathtaking establishing shots that give weight and scale to the entire day. They transform the venue from an ambiguous backdrop into a deliberate choice—a character in its own right that reflects the couple’s taste and aspirations. This is not just an artistic consideration; it’s a strategic business decision.
For photographers aiming to enter the luxury market, a portfolio that showcases architectural mastery is non-negotiable. High-end clients are not just buying photos of themselves; they are investing in the documentation of an entire, meticulously planned experience, of which the magnificent venue is a cornerstone. Demonstrating that you can capture the soul of a location signals that you understand the luxury mindset. It’s a clear indicator of value that justifies a premium price point, a fact underscored by market data. For instance, a global survey found that only 6% of wedding photographers charge above $8,000 for their top package, highlighting the small segment of the market where these comprehensive portfolios thrive.
Building this portfolio requires a proactive approach. You cannot attract luxury clients without showing luxury work. If current clients don’t have the budget for elaborate design, a photographer can step in to guide their aesthetic choices. By creating mood boards and offering respectful guidance on design, you can help craft the very “magic” you need to photograph, effectively building the portfolio that will attract the next tier of clientele. Ultimately, you must show the work you want to book.
How to Use 16mm Ultra-Wide Lenses to Capture Venue Scale Without Distorting Architecture
The ultra-wide lens is the most common tool photographers reach for to capture expansive spaces, yet it is also the most frequently misused. The goal is to convey scale, but the result is often a funhouse-mirror effect where straight lines bend and proportions warp. This is more than a technical error; it’s an act of architectural disrespect. True mastery lies in using the lens to honour the architect’s design, not to fight it. The primary challenge is lens distortion, which manifests as either barrel distortion (lines bowing outwards) or pincushion distortion (lines bowing inwards), especially at the edges of the frame.
The first step to control is in-camera. Keeping the camera perfectly level and parallel to the subject is paramount. Any upward or downward tilt will cause vertical lines (walls, columns, doorways) to converge, creating a “falling backward” effect known as keystoning. While sometimes used for dramatic effect, it often just looks amateurish. A tripod with a bubble level is your best friend. Furthermore, shooting with a “correction buffer”—leaving extra space around your subject—gives you room in post-processing to crop and correct perspective without losing crucial parts of the composition.
Post-processing is the second half of the battle. Modern software like Adobe Lightroom offers powerful tools specifically for this. Lens Correction profiles can automatically counteract the known distortion of your specific lens. The Transform panel then allows for manual fine-tuning of verticals, horizontals, and overall perspective. A documented real-world correction shows how a shot of a spired building, taken with an upward tilt to fit it in the frame, was easily rectified. In the example, a photo taken with a Nikkor 14-30mm zoom at 19mm had its verticals rectified using standard Lightroom tools, demonstrating the power of this workflow. By combining careful in-camera technique with thoughtful post-processing, you can use a 16mm lens to create images that feel vast and true.
Empty Architecture or Human-Scaled Grandeur: Which Better Conveys Wedding Venue Magnificence
The decision to photograph a grand space empty or with people in it is a fundamental narrative choice. There is no single correct answer; each approach tells a different story about the venue’s magnificence. An empty, pristine shot of a ballroom or a grand hall speaks the language of pure architecture. It allows the viewer to appreciate the architect’s vision without distraction—the clean lines, the soaring volumes, the interplay of light and shadow. It is a photograph *of* the space, celebrating its form and structure as a work of art in itself.
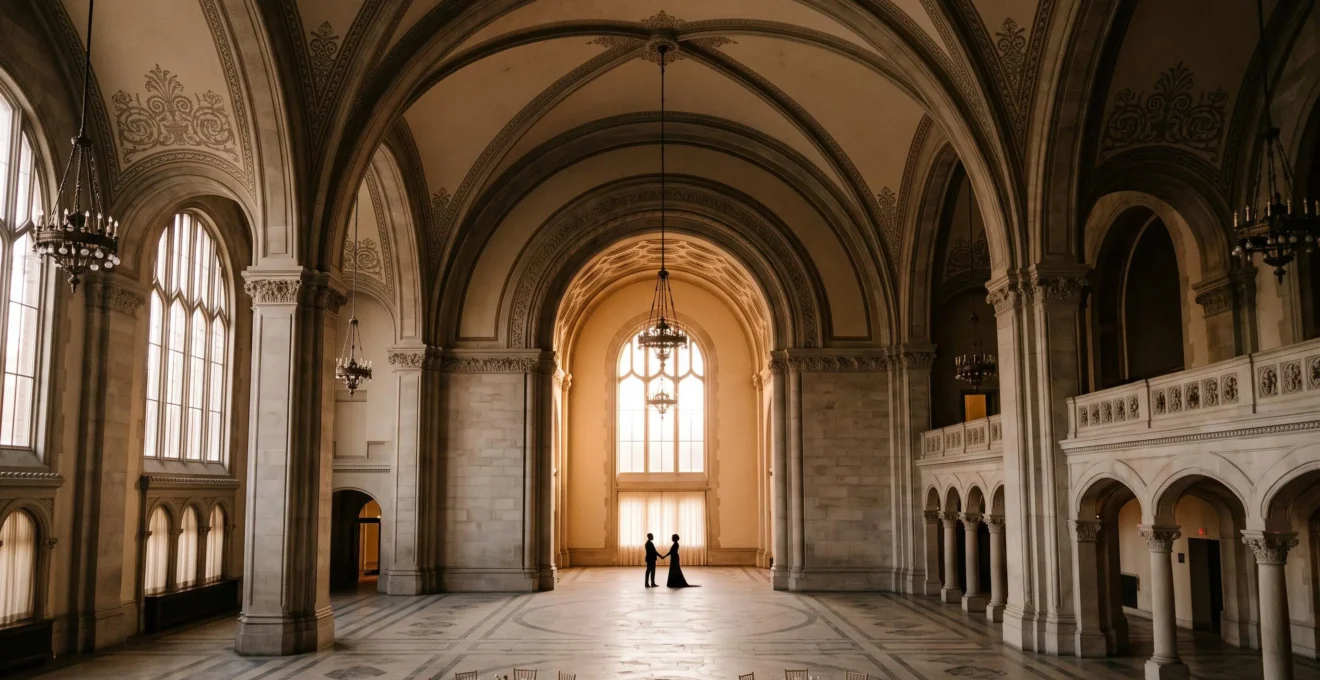
Conversely, introducing a human element radically changes the narrative. A person, or a couple, doesn’t just populate the space; they activate it. They provide an immediate and intuitive sense of scale that an empty room cannot. Our minds instinctively use the human form as a measuring stick. A tiny, silhouetted figure in a vast hall instantly communicates the immense size of the environment in a way that is both dramatic and emotionally resonant. The photograph is no longer just *of* the space; it’s about the human *experience within* the space. This technique transforms the viewer from a passive observer of architecture into an active participant in a story of human-scaled grandeur.
This vast empty ballroom with a tiny distant silhouetted figure is a perfect example of using a human as a unit of scale to emphasize architectural immensity.
Many historic venues offer opportunities for both approaches. As one case study of the Vizcaya Museum & Gardens illustrates, the venue’s design can be leveraged for different narrative purposes. The photographer suggested using the privacy of the garden grottos for an intimate first look, followed by grand portraits in the formal gardens. This showcases how a single location can be used to tell stories of both intimacy and grandeur. The best photographers understand when to let the architecture speak for itself and when to use a human touch to give it a voice.
The Detail Obsession That Misses the Overall Venue Grandeur in Wedding Photography
In the quest to capture every element of a wedding day, it’s easy to fall into the trap of “detail obsession.” Photographers meticulously shoot the rings, the flowers, the place settings, the shoes. When it comes to the venue, this translates to close-ups of doorknobs, cornices, and light fixtures. While these shots can be beautiful, they often fail to contribute to the sense of overall grandeur. A gallery filled with disconnected details feels fragmented, like a list of objects rather than an immersive experience. The key is not to stop shooting details, but to shoot them in a way that *hints at the whole*.
A successful detail shot is one that acts as a microcosm of the larger space. It isolates a beautiful element while retaining a sense of its environment. Instead of a flat, head-on shot of a chandelier, for example, a more powerful image would frame it from a low angle, allowing the sweeping curve of the vaulted ceiling to arc above it. This single composition does double duty: it showcases the intricate craftsmanship of the fixture while simultaneously reminding the viewer of the vast, soaring space it inhabits. The detail becomes an anchor point, drawing the eye in before leading it outwards to comprehend the surrounding scale.
This image of an ornate chandelier perfectly demonstrates this principle, connecting the small detail to the grandeur of the whole room through composition.
This approach requires a shift in thinking. Ask yourself: “How can this small element tell a bigger story?” Use selective focus to draw attention to the detail while keeping the background architecture softly legible. Use framing to place the detail within the context of a doorway, an arch, or a window. By creating a visual link between the part and the whole, you move beyond simple documentation. You begin to create a more sophisticated and layered spatial narrative, where every image, no matter how small its subject, reinforces the magnificent character of the venue.
When to Photograph Venue Grandeur: Before Guest Arrival or During Reception Chaos
The timing of your architectural shots is as crucial as the composition. You have two primary windows of opportunity, each offering a distinct mood and set of challenges: the pristine calm before guests arrive, and the dynamic energy of the reception. A complete venue story requires capturing both. Before guest arrival, the venue is a blank canvas. This is your time for pure architectural photography. The light is often clean, the spaces are uncluttered, and you have the freedom to move and set up a tripod to create those perfect, sterile shots that celebrate the building’s form. This is when you capture the architect’s intent, the serene majesty of the space in its ideal state.
The reception, however, presents an entirely different opportunity. The “chaos” is not a hindrance; it’s the subject. The venue is no longer just a building; it’s a container for joy, energy, and celebration. Your job is to capture the architecture interacting with this human element. This often calls for a different set of techniques, like shutter-dragging on the dance floor. This technique involves using a slower shutter speed combined with a burst of flash. The flash freezes the subject (the dancers), while the slow shutter allows the ambient light and movement to blur into beautiful streaks of colour. This method perfectly captures the feeling of a vibrant, living space, where the architecture itself seems to be pulsating with the energy of the party.
Mastering this technique requires balancing several settings. As one expert guide on reception photography explains, it’s about finding the sweet spot where motion blur and frozen action coexist. You can achieve this “blurry, dreamy background” by carefully managing your camera’s settings to let in more ambient light while the flash does the work of isolating your subjects.
Your Action Plan: Camera Settings for Shutter-Drag Reception Photography
- Set shutter speed around 1/10 to 1/30 sec—this gives enough motion blur without losing control.
- Keep aperture balanced depending on the ambient light (f/2.8–f/5.6 is usually a good range).
- Use a lower flash power setting (like 1/32 or 1/64) so it doesn’t overpower the ambient light and its colour.
Why Some Architectural Photos Convey Grand Scale While Others Make Large Spaces Feel Small
Have you ever seen a photograph of a huge space that somehow felt cramped and flat? The reason often lies in a misunderstanding of how wide-angle lenses truly work. The common misconception is that their primary purpose is to “fit everything in.” While they do have a wider field of view, their most powerful attribute is the ability to exaggerate depth and the relationship between foreground, midground, and background. A photo feels grand not just because it’s wide, but because it invites the viewer’s eye on a journey through a layered, three-dimensional scene.
A photo that lacks a strong foreground element often fails to convey scale. The viewer has no point of entry, no reference for depth. By placing an object—a chair, a floral arrangement, the edge of a table—close to your lens, you create a powerful sense of perspective. As one expert notes, seasoned photographers know that the most effective use of wide-angle lenses is to exaggerate this layering. This foreground anchor makes the background feel more distant and, therefore, makes the entire space feel larger. The photo becomes a window the viewer can step through, rather than a wall they are looking at.
Preserving this sense of scale also means being vigilant about technical fundamentals. A slight downward tilt can make a towering hall feel shorter. Crooked horizons disrupt the stability of the scene. To avoid these pitfalls, a systematic approach is necessary. First, consider if an ultra-wide lens is even needed; a longer focal length naturally maintains straighter lines. If you must go wide, keep the camera perfectly level. Finally, leverage post-processing tools to correct any remaining distortions, turning skewed lines into the crisp, professional compositions that properly honour the venue’s scale.
How to Spot Natural Leading Lines in Wedding Venues From Hallways, Arches, and Symmetrical Architecture
Leading lines are one of the most fundamental composition tools, but in the context of grand architecture, they are more than just a trick to guide the eye. They are the pathways the architect designed to guide the body. Hallways, colonnades, rows of arches, and the edges of grand staircases are not accidental; they are intentional elements designed to create flow, rhythm, and a sense of direction. Your job as a photographer is to recognize and amplify this intended path, using it to create images with powerful depth and a clear focal point.
Symmetry is a particularly potent form of leading lines. When you encounter a symmetrical space—a grand hall with a central aisle, a facade with a perfectly centered door—honouring that symmetry is paramount. A powerful case study on capturing the Alhambra demonstrates this principle. The photographer noted, “I was very careful to position myself perfectly in front of the entrance… and put the latter at the exact center of the photo.” By perfectly aligning the camera sensor with the building’s plane, he avoided perspective distortion and captured the formal, balanced beauty of the design as intended. This requires precision: find the exact center line and ensure your camera is level.
However, shooting down long hallways or corridors with a wide-angle lens introduces the familiar problem of converging verticals, also known as keystoning. While this can happen at any focal length, it’s most pronounced with wide lenses. The parallel lines of the walls appear to converge, creating a distorted sense of space. The fix, once again, is twofold. In-camera, keeping the lens perfectly horizontal will keep the vertical lines straight. If correction is needed in post, software tools allow you to select lines in the image that should be vertical or horizontal and automatically straighten the entire composition, restoring the architectural integrity of the scene.
Key Takeaways
- Grandeur is a business decision: Showcasing architectural scale is essential for attracting luxury clients and justifying premium pricing.
- Honour the architect’s intent: The primary goal is to translate the venue’s spatial narrative, which means correcting lens distortion to respect its original lines.
- Tell a story with scale: Use the choice between empty architectural shots and human-populated frames to deliberately craft a narrative of either pure form or human experience.
How to Convey Monumental Architectural Scale in Wedding Venue Photography
Ultimately, conveying monumental scale is about making a series of deliberate choices that all serve one purpose: to evoke a feeling of awe. It goes beyond any single technique and becomes a holistic approach to seeing and interpreting space. Sometimes, the most powerful tool is not a lens, but your understanding of light. A single shaft of light cutting through a dark, cavernous hall can reveal the shape of a grand staircase and hint at the immense, unseen volume around it. This use of chiaroscuro—the interplay of light and shadow—creates drama, mystery, and a profound sense of scale by what it conceals as much as by what it reveals.
This dramatic image of a single shaft of light sculpting a grand staircase is a testament to the power of light in defining scale and mood.
For situations demanding both a wide field of view and a creamy, out-of-focus background—a look that is impossible to achieve with a single wide-angle shot—more advanced techniques are required. The Brenizer Method (or “bokeh panorama”) is a perfect example. This involves taking multiple, overlapping shots with a longer lens (like an 85mm or 135mm) set to a wide aperture (like f/1.8). These individual frames are then stitched together in post-production to create a single, massive-resolution image that has the wide angle of view of a 35mm lens but the shallow depth of field of an 85mm lens. As experts explain, what makes the Brenizer Method work is the combination of a wide angle of view and a shallow depth of field. It’s a way to have the best of both worlds: epic scale and beautiful subject isolation.
Your Action Plan: How to Execute the Brenizer Method for Architectural Grandeur
- Recognize that you cannot produce these kinds of photographs with a single wide-angle lens alone; you must plan to take several images to sew together into one composition.
- Set your camera to manual focus and exposure. Take a shot of your subject, then, overlapping each frame by about 30-50%, photograph the surrounding architecture in a grid pattern.
- In post-processing, use software like Lightroom or Photoshop to merge the images into a panorama. The resulting image will have a unique, wide-yet-compressed look that isolates the subject against a beautifully blurred but contextually vast background.
By shifting your perspective from merely documenting a room to interpreting a spatial narrative, you will unlock a new level of artistry and value in your work. The next time you step into a magnificent venue, take a moment. Don’t just see a backdrop; see the lines, feel the volume, and begin the dialogue with the architecture. Then, you will be ready to capture its true splendour.