
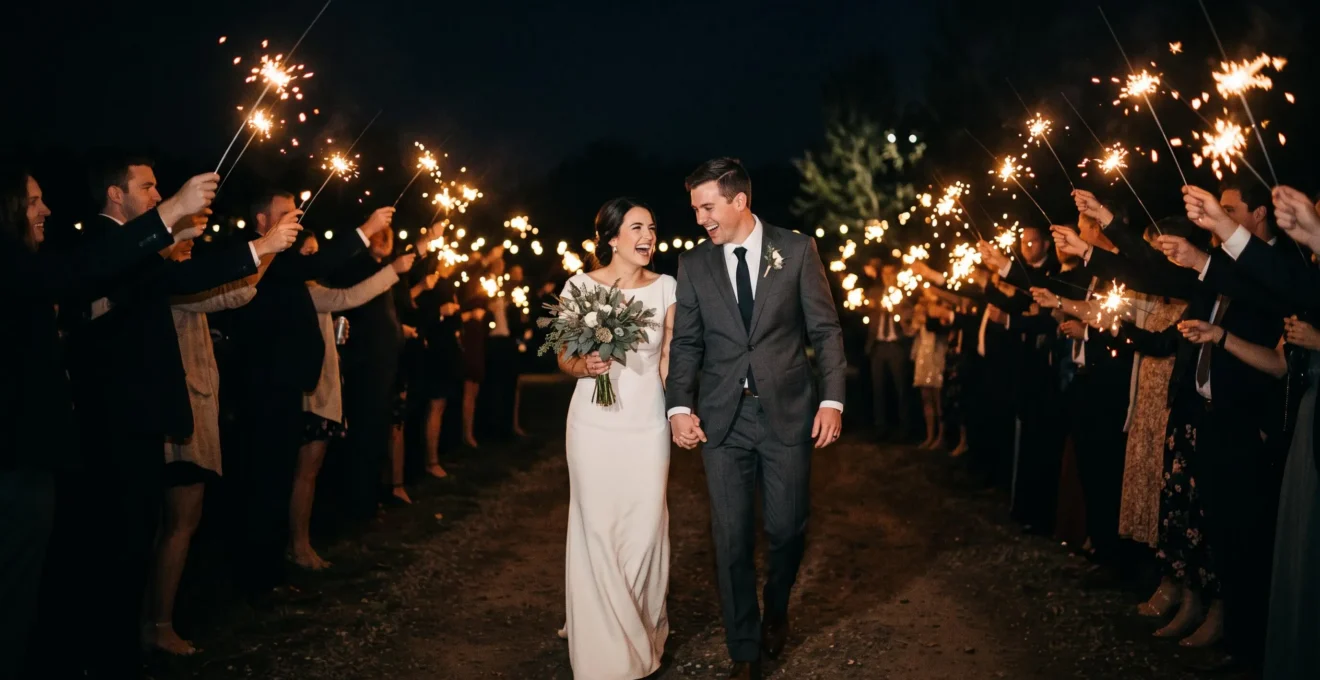
In summary:
- The common problem with sparkler exits is choosing between a sharp couple (with no light trails) or nice trails (with a blurry couple).
- The solution is to blend two exposures in-camera: use a slow shutter speed (1-2 seconds) to paint the light trails and a rear-curtain sync flash to freeze the couple at the end of the exposure.
- Mastering this technique involves balancing shutter speed for trail length, flash power for subject sharpness, and aperture/ISO for ambient background light.
- Logistical preparation, like using long sparklers and coordinating with guests, is just as critical as the technical settings.
For many wedding photographers, the sparkler exit is a moment of high-stakes anxiety. You have one chance to capture a chaotic, fast-moving scene in near darkness. The conventional wisdom often leads to a frustrating compromise: either you use a fast shutter speed to freeze the couple, resulting in a sharp but sterile image devoid of the magical light trails, or you slow the shutter to capture the motion, ending up with beautiful streaks of light but a disappointingly blurry couple. This creative conflict leaves many professionals feeling they have to choose between technical precision and artistic impact.
The standard advice to simply crank up the ISO and use a wide aperture only gets you so far, often leading to noisy images or missed focus. The truth is, the advice is incomplete. It addresses the ambient light problem but fails to solve the core conflict between capturing static sharpness and fluid motion within a single frame. It treats the sparkler exit as a low-light problem when it is, in fact, a motion problem.
But what if the key wasn’t a compromise, but a technical synergy? What if you could have both a critically sharp couple and the sweeping, dramatic light trails that tell the story of their grand exit? The solution lies in a technique that many cameras have but few photographers master for this specific scenario: rear-curtain sync flash combined with a deliberate shutter drag. This isn’t about getting a lucky shot; it’s about taking control of your camera’s exposure timing to paint with light.
This guide breaks down the exact exposure-technique-focused method to achieve this powerful effect. We will move beyond the basic settings and delve into the mechanics of flash sync, shutter speed calculation, and compositional strategy, turning one of the night’s most challenging moments into a signature, portfolio-worthy image.
To navigate this technical deep-dive effectively, the following guide is structured to build your skills from the foundational principles of flash sync to the final, powerful closing images that will elevate your wedding galleries. Here is what we will cover.
Summary: A Technical Guide to Capturing Flawless Sparkler Exit Photos
- Why Rear-Curtain Flash Sync Creates Better Sparkler Exit Photos Than Front-Curtain or Ambient-Only
- How to Calculate the Perfect Shutter Speed for Sparkler Exits Between 1 Second and 2 Seconds
- Wide Sparkler Tunnel or Tight Couple Intimacy: Which Framing Creates More Dramatic Exit Photos
- The Guest Interference Mistake Where Phones and Cameras Ruin Clean Sparkler Exit Sightlines
- When to Advise Couples to Light Backup Sparklers After Initial Set Burns Out Halfway
- How to Master Panning Technique for Sharp Subjects Against Blurred Backgrounds During Wedding Sparkler Exits
- How to Combine Motion Blur With Sharp Subjects Using Slow-Sync Flash on Dance Floors
- How to Photograph Grand Wedding Exits That Provide Powerful Closing Images for Your Galleries
Why Rear-Curtain Flash Sync Creates Better Sparkler Exit Photos Than Front-Curtain or Ambient-Only
The key to unlocking the perfect sparkler exit shot lies in understanding how your flash synchronizes with your shutter. Most photographers start with the default, front-curtain sync, where the flash fires at the beginning of the exposure. This works for static subjects, but with a moving couple and a slow shutter, it creates light trails that appear *in front* of them, making it look like they are moving backward. It’s an unnatural and disorienting effect. As the SLR Lounge Editorial Team notes, when using this technique correctly, you can clearly see how “the subject is sharp and motion is captured.” This is the holy grail we’re after, and it’s achieved with a specific setting.
The solution is Rear-Curtain Sync. In this mode, the shutter opens and begins to record the ambient light—capturing the beautiful, flowing trails of the sparklers—and then the flash fires just *before* the shutter closes. This final burst of light freezes the couple in a sharp, clear state at the end of their movement, with the light trails streaming elegantly behind them. This accurately represents their forward motion and creates a dynamic, visually coherent image. Shooting with ambient light only is another option, but without a flash to freeze the action, you’re left with a painterly blur across the entire frame, which can be artistic but fails the brief of capturing a sharp couple.
The difference is only apparent at slower shutter speeds where you are intentionally trying to blend a frozen subject with motion blur. This technique of “shutter dragging” is the foundation of a dynamic sparkler exit photo. The table below, based on an analysis from Digital Camera World, breaks down the critical differences. Note how rear-curtain sync is purpose-built for capturing moving subjects sharply against a blur trail, which is precisely our goal.
| Sync Mode | When Flash Fires | Effect on Light Trails | Best Use Case |
|---|---|---|---|
| Front-Curtain Sync | Start of exposure | Trails appear in front of the moving subject, making them look like they’re moving backward | Static or slow-moving subjects |
| Rear-Curtain Sync | End of exposure | Trails appear behind the subject, correctly showing the direction of travel | Sparkler exits, dance floor motion, night action shots |
Ultimately, choosing rear-curtain sync is not just a technical preference; it’s a narrative choice. It allows you to tell the story of the exit with a clear beginning (the start of the trail), middle (the motion), and end (the sharp, happy couple), all within a single, powerful frame.
How to Calculate the Perfect Shutter Speed for Sparkler Exits Between 1 Second and 2 Seconds
Once you’ve set your camera to rear-curtain sync, the next critical variable is your shutter speed. This is where the artistry comes in, as your shutter speed directly controls the length and character of the light trails. Forget the standard advice of keeping your shutter at 1/125s; for this technique, we are deliberately “dragging the shutter” and inviting motion into the frame. The range between 1 and 2 seconds is the sweet spot for creating substantial, elegant trails without introducing unmanageable camera shake or making the couple wait an awkwardly long time.
There isn’t a magic formula, but a logical process. The “calculation” is a creative choice based on two factors: the length of the sparkler tunnel and the speed of the couple. For a short, fast walk, a 1-second exposure might be perfect, capturing the full journey. For a longer, more leisurely stroll down a 50-foot tunnel of guests, a 1.5 or 2-second exposure will allow you to paint longer, more dramatic lines of light. Start with a baseline of 1 second and adjust based on your test shots. If the trails feel too short and abrupt, slow the shutter down. If they’re a chaotic mess and the couple is out of the frame before the flash fires, speed it up.
Your aperture and ISO work in support of this shutter speed. You’ll likely be in the range of f/2.8 to f/5.6 to keep enough of the couple in focus, and an ISO of 1600 to 3200 to capture the ambient glow of the sparklers and the background. The key is to balance the three elements. Your slow shutter speed is for the trails, your flash is for the couple’s sharpness, and your aperture/ISO are for the overall brightness of the scene’s ambient light. Remember, the flash exposure on the couple and the ambient exposure for the background are two separate things happening in one shot.
By thinking of your shutter speed not as a tool to freeze motion but as a paintbrush to trace it, you shift from a reactive photographer to a proactive artist, deliberately designing the final look of the image.
Wide Sparkler Tunnel or Tight Couple Intimacy: Which Framing Creates More Dramatic Exit Photos
Once your technical settings are dialed in, the next decision is compositional: do you go wide to capture the entire scene, or tight to focus on the couple’s emotion? Both approaches have merit and create dramatically different images. The “right” choice depends on the story you want to tell. The wide shot is about scale, community, and atmosphere. The tight shot is about intimacy, emotion, and connection.
The wide framing, often achieved with a 24mm or 35mm lens, tells the story of the celebration. By stepping back, you incorporate the entire tunnel of cheering guests, the dark night sky, and the architecture of the venue. This environmental portrait emphasizes the context and scale of the moment. As photographer Mark Davidson explains his preference for this style, “I frame these wide on purpose so you see the whole scene, not just the two of you in a tight crop.” It transforms the exit from a portrait of two people into a portrait of a shared, joyful event.
On the other hand, the tight framing, typically using an 85mm lens or the longer end of a 24-70mm, isolates the couple from the chaos. This approach uses compression and a shallow depth of field to turn the background sparklers into a beautiful, abstract bokeh of golden light. The focus is entirely on the couple’s faces, their laughter, their kiss, their shared glance. This creates a powerful, emotional hero shot that feels intimate and personal, as if they are the only two people in the world. Making the right lens choice is crucial for executing either vision:
- Wide/Story option: A 35mm f/1.4 is ideal if the exit path is narrow and you need a wider field of view.
- Tight/Portrait option: An 85mm f/1.4 or f/1.8 gives beautiful compression and bokeh, but you will need to stand farther back.
- Flexible option: A 24-70mm f/2.8 zoom offers versatility if you want flexibility to capture both wide and tight shots, though it is one stop slower than primes.
Many photographers will shoot both. Start wide to establish the scene as the couple begins their walk, then quickly switch to a tighter composition (or use a second camera body) to capture the emotional peak as they pass you. This gives you the best of both worlds for their final gallery.
The Guest Interference Mistake Where Phones and Cameras Ruin Clean Sparkler Exit Sightlines
Even with perfect camera settings and a brilliant compositional plan, a sparkler exit can be ruined by a single, pervasive factor: guest interference. In their excitement, guests will inevitably lean into the aisle with their phones and personal cameras, creating a messy, distracting gauntlet that clutters your sightlines and reflects ugly light from their screens. This logistical challenge is as critical to manage as your f-stop. With a reported 30% increase in sparkler usage at weddings, the odds of crowd chaos are higher than ever, demanding proactive coordination.
The most effective solution is to deputize a “sparkler wrangler.” This is typically the wedding planner, a groomsman, or a venue coordinator. Before the exit, you must communicate the plan to this person. Their job is to prevent the common failure points and maintain order. This isn’t about being bossy; it’s about ensuring the couple gets the amazing photos they’ve paid for. The process involves a few key steps:
- Step 1: Recognize that when too many people are involved, or worse, when no one takes charge, confusion runs rampant. Designate one person to be in charge ahead of time.
- Step 2: Avoid the common failure where the first guests to light their sparklers are left with burnt-out sticks by the time the couple even makes it down the tunnel. The wrangler should organize a “wave” of lighting from the end of the tunnel to the start.
- Step 3: Have the designated wrangler instruct guests to form two straight, evenly spaced lines and, most importantly, to hold their sparklers up and *out* over the aisle, creating a clean canopy of light rather than a wall of arms and phones.
Another crucial element of coordination involves other professionals. As photographer Katch Silva wisely advises, “If there is a videographer, make sure you talk to them well beforehand about their plans for the exit.” You both need to be on the same page about positioning, lighting (their video light can ruin your ambient exposure), and movement to avoid getting in each other’s shots. A 30-second chat can prevent a major headache.
Ultimately, a successful sparkler exit photo is 50% technical skill and 50% logistical management. By taking charge of the environment, you create the clean canvas you need to execute your technical vision.
When to Advise Couples to Light Backup Sparklers After Initial Set Burns Out Halfway
One of the most common points of failure for a sparkler exit is time. The standard 18-inch or 20-inch sparklers, while popular, burn for only about 1.5 to 2 minutes. This sounds like a lot, but in the chaotic reality of a wedding, it’s barely enough time to get everyone organized, lit, and for the couple to make their pass. Often, by the time the couple is halfway down the tunnel, the sparklers at the beginning have already fizzled out, leaving a dark, empty patch in your photos.
The best solution is proactive consultation. As the photography expert, it’s your job to guide the couple on their sparkler choice long before the wedding day. If you know an exit is planned, advise them on the importance of sparkler length. While 36-inch sparklers can burn for up to 3.5 minutes, providing a much safer buffer, many couples will have already purchased the shorter, more common variety. In this case, your advice must shift from prevention to management. Advise them to purchase a backup set—a “second wave” of sparklers.
Here’s how to advise them effectively, turning potential failure into a guaranteed success:
- Step 1: If you know a couple is having a sparkler exit before the wedding day, ask them to get the longest, biggest sparklers they can, since regular sized sparklers burn out very fast.
- Step 2: Remind them that shorter sparklers mean way less light for the photographer to shoot in, and way less excitement for the tunnel. Explain that a longer burn time allows for more photo opportunities, like a second pass or a kiss in the middle.
- Step 3: Recommend a pre-wedding burn test on one sparkler so the couple and planner know the real, timed duration rather than trusting the packaging estimate. This data is crucial for planning.
If they are stuck with short-burning sparklers, plan for a “relay.” Have the sparkler wrangler instruct the guests at the start of the tunnel to light a second sparkler as the couple passes the halfway point. This ensures a continuously bright, vibrant tunnel from start to finish. It requires more coordination but is the only way to salvage a full, beautiful scene with inadequate equipment.
Your expertise here not only saves the shot but also positions you as a trusted advisor who thinks through every contingency, reinforcing your value far beyond just clicking the shutter.
How to Master Panning Technique for Sharp Subjects Against Blurred Backgrounds During Wedding Sparkler Exits
While the classic rear-curtain sync shot involves you standing still, an advanced and highly creative variation is to add a panning motion. Panning is the technique of moving your camera along with the moving subject. When combined with a slow shutter speed and flash, it creates a unique effect: the subject (the couple) is frozen sharply by the flash, while the background and the sparklers themselves are streaked into beautiful lines of motion. This adds an incredible sense of speed and dynamism to the image.
To execute a successful pan during a sparkler exit, you need to be perfectly in sync with the couple’s movement. Stand parallel to their path of travel. As they approach, track them smoothly in your viewfinder, pressing the shutter button halfway to maintain focus. When they are directly in front of you, fully press the shutter and continue to pivot your body and camera at the same speed as the couple, even after you hear the shutter close. This follow-through motion is the key to a smooth, intentional blur in the background, rather than a chaotic, shaky mess.
The settings for this are an extension of the shutter drag technique. You’re simply adding a new layer of motion. Here are the starting points for a panned sparkler shot:
- Step 1: Start your shutter speed around 1/10 to 1/30 sec. This is slow enough to create motion blur in the background but fast enough to maintain some control while panning.
- Step 2: Keep your aperture balanced depending on ambient light, typically f/2.8-f/5.6. You need enough depth of field to keep the couple in focus as you move.
- Step 3: Slightly move your camera during the exposure—not just horizontally, but perhaps with a slight tilt or twist—to create more artistic light streaks as part of the panning motion.
This is a technique that invites experimentation. As photographer Holly Birch suggests, “It can also be fun to move your camera while the shutter is open. I sometimes will twist my camera in a circular motion or in a diagonal direction during the exposure.” Don’t be afraid to play; the results can be uniquely stunning.
Because of its lower hit rate, this is a shot to attempt *after* you’ve already secured a safe, classic exit photo. But when it works, a panned sparkler exit shot can be one of the most dynamic and memorable images of the entire wedding day.
How to Combine Motion Blur With Sharp Subjects Using Slow-Sync Flash on Dance Floors
The principles of dragging the shutter with rear-curtain sync are not limited to sparkler exits. This powerful technique is one of the most effective tools for creating dynamic, energy-filled photographs on a dark wedding dance floor. The concept is identical: use a slow shutter speed to capture the ambient light, the colored DJ lights, and the blur of dancing bodies, then use a pop of rear-curtain sync flash to freeze your primary subject in a moment of sharp, clear action. This creates a story of a wild party atmosphere with a focused, emotional centerpiece.
One of the most creative applications is the “spotlight” or “vortex” effect. This involves manipulating your flash to create a focused beam of light that isolates your subject, making them pop from the swirling, blurry background. It’s a highly stylized look that can transform a standard dance floor shot into a piece of art. This is a perfect place to implement a clear action plan.
Action Plan: Auditing Your Slow-Sync Flash Setup
- Points of contact: Check all sync connections. Is the flash set to Rear-Curtain Sync in the camera menu? Is the hot-shoe connection secure? Is the flash head zoomed to its narrowest setting (e.g., 105mm or 200mm) to create the spotlight effect?
- Collecte: Take a test shot. What are the existing elements in the frame? Note the ambient light level, the color of the DJ lights, and the speed of the dancers’ movements. This is your baseline.
- Cohérence: Does the test shot match your creative vision? If the background is too bright and washes out the motion blur, lower your ISO or close down your aperture. If your subject is too dark, increase your flash exposure compensation.
- Mémorabilité/émotion: Is the motion interesting? A 3.2 second exposure might yield a winner with incredible light trails, but a 1/8 second exposure might capture a more immediate sense of energy. Experiment with different shutter speeds to see what feels most dynamic.
- Plan d’intégration: Prioritize your shots. Get the “safe” shots first with a moderate shutter drag (1/8s – 1/15s), then get creative. Try a long exposure with a camera twist or a dramatic pan to create something truly unique for the gallery.
As the Photofocus team discovered while experimenting, pushing the limits can yield incredible results: “We tried various timing exposures starting at two seconds and going longer. Ultimately, a 3.2 second exposure yielded the winner.” This demonstrates that on a dance floor, where you have more time and control than a one-pass sparkler exit, you can be much more experimental with your shutter speed to create truly breathtaking motion.
By mastering shutter drag for sparkler exits, you’ve already learned the skills to dominate the dance floor, adding immense value and variety to your final wedding gallery.
Key takeaways
- Rear-curtain sync is the non-negotiable technical foundation for blending sharp subjects with motion trails.
- Think of it as two exposures in one: your shutter speed (1-2s) controls the length of the ambient light trails, while your flash exposure freezes the subject independently.
- Logistical success is as critical as technical skill. Ensure you have long-burning sparklers and a designated “wrangler” to manage guests for a clean shot.
How to Photograph Grand Wedding Exits That Provide Powerful Closing Images for Your Galleries
Mastering the technical art of the sparkler exit is more than just learning a new camera setting; it’s about adding a powerful, climactic final chapter to the story of the wedding day. The grand exit shot is often the last image the couple and their family will see in the gallery, and it serves as a powerful bookend to the entire event. It’s the “happily ever after” moment, captured with energy and emotion. For today’s couples, this moment is more important than ever. A recent study shows that a staggering 67% of Gen Z couples now choose a grand entrance or exit, compared to just 49% of Millennials, making it a commercially vital shot to have in your arsenal.
When you successfully combine a sharp subject with beautiful motion blur, you’re not just taking a photo; you’re creating an heirloom. You’re capturing the feeling of the moment—the rush of joy, the celebration of community, and the forward momentum into a new life together. This is the shot that gets printed large, shared widely, and becomes the defining memory of the end of the night. As trend analyst Alex Chen notes, “We’re seeing a trend towards long-exposure shots that create stunning light trails, immortalizing the couple’s exit in a sea of stars.”
This image is the culmination of all the techniques discussed. It is the reward for managing the chaos, for understanding the physics of light and time, and for guiding your clients with expert advice. It’s the difference between a simple snapshot and a signature piece of art that defines your brand. The ability to reliably produce images like this is what separates an amateur from a seasoned professional.
By investing the time to master this skill, you ensure that the final page of your couple’s wedding story is as epic, beautiful, and memorable as the day itself. Start practicing these techniques at your next wedding to transform your exit photos from simple documentation into breathtaking art.