
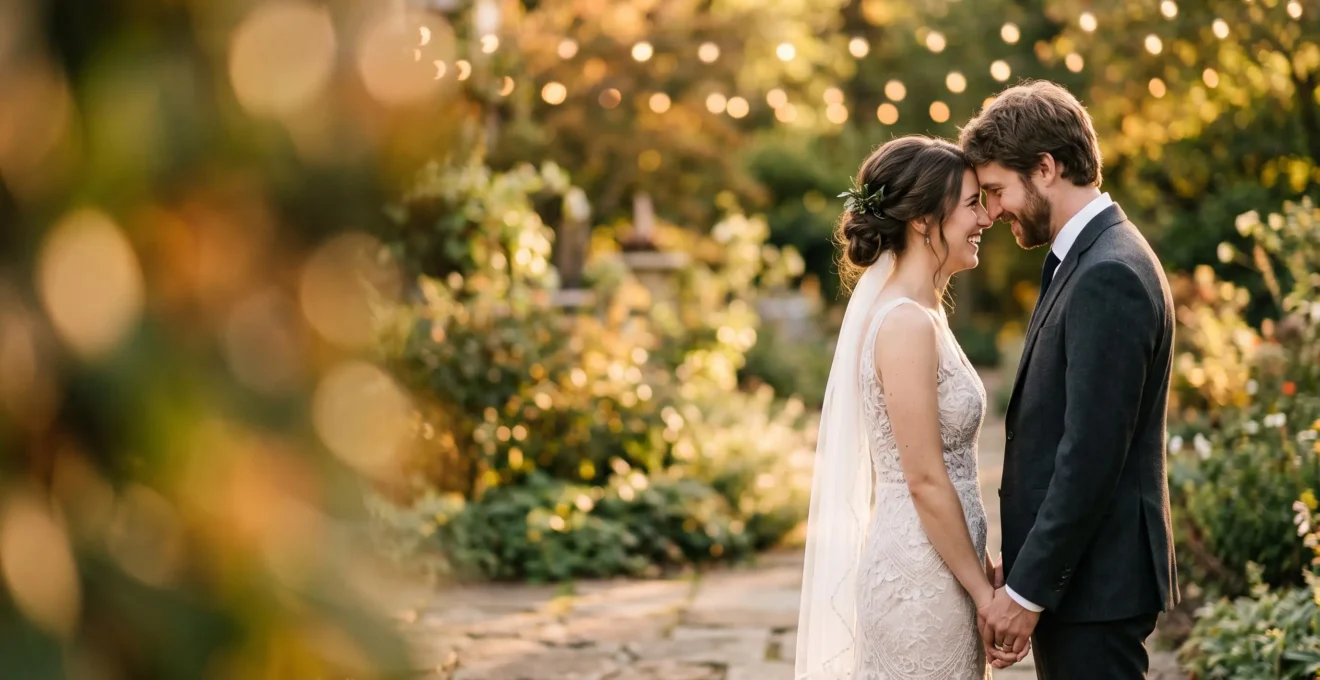
In summary:
- Achieving “dreamy” bokeh is about the quality of the blur, not just the quantity. The shape and number of a lens’s aperture blades are key.
- You can dramatically increase subject separation without a faster lens by increasing the distance between your subject and the background and using longer focal lengths for compression.
- The “best” aperture isn’t always the widest. Stop down slightly to retain environmental context, especially in beautiful wedding venues.
- Vintage lenses offer unique “character” bokeh (like swirls) that can create a more artistic and less clinical look than modern, sharp optics.
- Apply shallow depth of field strategically for portraits and details, but use a deeper depth of field for grand scenics and large group shots.
Every wedding photographer chases it: that magical, three-dimensional pop where the couple seems to float against a soft, creamy, painterly background. The common advice is simple and relentless: open your aperture as wide as it will go. Shoot at f/1.8, f/1.4, or even f/1.2. While this is the foundation of shallow depth of field, it’s only a fraction of the story. Many photographers follow this rule religiously yet find their backgrounds are merely blurry, not beautiful. They achieve separation, but the result feels harsh, busy, or lacks that truly cinematic, dreamy quality.
The pursuit of a faster, more expensive lens often becomes the default solution. But what if the secret to breathtaking bokeh isn’t just about maximizing the blur, but about consciously shaping its character? The difference between a distracting, “nervous” background and a smooth, buttery one lies in understanding the subtle physics of your optics and the spatial relationships within your frame. It’s about moving beyond a purely technical instruction—”use a wide aperture”—and embracing a more artistic one: sculpting the out-of-focus areas as a deliberate compositional element.
This guide reframes the conversation around subject separation. We will explore why some lenses produce superior bokeh, how to manipulate distance and focal length to your advantage, and when to intentionally sacrifice maximum blur for the sake of storytelling. By the end, you won’t just know how to blur a background; you’ll understand how to make that blur an active, aesthetic ingredient that elevates your portraits from simple snapshots to cinematic stills.
To navigate this deep dive into the art of separation, the following sections will break down each critical component, from the mechanical properties of your lenses to the creative decisions you make on the wedding day.
Summary: How to Create Dreamy Bokeh Background Separation That Makes Subjects Pop in Wedding Portraits
- Why Some Lenses Create Smooth Creamy Bokeh While Others Produce Harsh Distracting Background Blur
- How to Increase Bokeh Separation by Manipulating Subject Distance Instead of Buying Faster Lenses
- Vintage Lenses With Character Bokeh or Modern Sharp Optics: Which Creates More Pleasing Wedding Background Blur
- The Extreme Bokeh Mistake That Obliterates All Environmental Context in Wedding Venue Photography
- Which Wedding Moments Benefit From Dreamy Bokeh and Which Require Sharp Environmental Detail
- 85mm f/1.4 or 135mm f/2:How to Anticipate and Capture Candid Wedding Moments Before They Vanish Forever
- How to Create Soft Wrap-Around Portrait Light Using Large Diffusion Modifiers
- How to Create Cinematic Depth of Field That Makes Wedding Photos Look Like Film Stills
Why Some Lenses Create Smooth Creamy Bokeh While Others Produce Harsh Distracting Background Blur
The term “bokeh” is often used interchangeably with “background blur,” but this misses a crucial distinction. Bokeh refers to the aesthetic quality of the blur, not simply its amount. This is why a portrait shot at f/2.8 with a high-end telephoto zoom can have more pleasing bokeh than one shot at f/1.8 with a budget-friendly prime. The character of the blur—whether it’s smooth and creamy or harsh and “nervous”—is physically determined by the optical design of the lens itself, particularly its aperture diaphragm.
This diaphragm is made of a set of interlocking metal blades that form the opening for light to pass through. The number of blades and, more importantly, their shape, dictates the quality of your bokeh. Lenses with more aperture blades that are curved to maintain a circular opening, even when stopped down, produce the most pleasing results. They render out-of-focus highlights as soft, round orbs of light. In contrast, lenses with fewer, straight-edged blades can create geometric, distracting shapes (like hexagons or octagons) in the background, especially when you stop down from the maximum aperture. This can lead to a “busy” or “jittery” background that pulls attention away from your subject.
Furthermore, the internal construction and quality of the glass elements play a role. Poorly corrected lenses can produce “onion-ring” bokeh, where out-of-focus orbs have visible concentric circles inside them, or “cat’s eye” bokeh, where orbs near the edge of the frame are distorted into an elliptical shape. As an in-depth guide on aperture explains, these physical characteristics are fundamental to a lens’s optical signature.
- The Aperture Blade Mechanism: Inside every lens, thin metal blades create the aperture opening that controls light.
- Impact on Bokeh Quality: The shape and number of these blades directly influence how out-of-focus areas are rendered.
- Blade Shape is Key: Lenses with rounded aperture blades produce rounder, more visually pleasing bokeh highlights.
- More Blades, Better Bokeh: Generally, lenses with a higher blade count (e.g., 9, 11, or more) create a more circular aperture and thus softer, creamier defocused backgrounds. This advanced construction is often a factor in their higher price.
How to Increase Bokeh Separation by Manipulating Subject Distance Instead of Buying Faster Lenses
While a wide aperture is the most direct tool for shallow depth of field, it’s not the only variable you control. Two other powerful factors are often overlooked: the subject-to-camera distance and, more importantly, the subject-to-background distance. By mastering the interplay between these distances, you can create dramatic subject separation even with a lens that isn’t exceptionally “fast.” The fundamental rule is simple: the greater the distance between your subject and the background, the more blurred that background will become, regardless of your aperture.
Instead of just placing a couple against a wall, take ten steps back and have them take ten steps forward, away from that same wall. This simple act of creating physical space dramatically enhances the background blur. This technique is especially powerful when combined with focal length compression. A longer focal length, like an 85mm or 135mm, appears to compress the distance between the subject and background, making the blur feel more intense and immersive. This is how you can achieve that creamy, isolated look even when shooting at f/2.8 or f/4.
This approach frees you from being creatively limited by your gear. Don’t have an f/1.4 lens? Use your 70-20mm f/2.8 at the long end (200mm), step back from your subject, and ensure there is significant distance behind them. The resulting compression and separation will often look more professional and cinematic than a shot from a wider lens up close. The key is to actively scout for locations that offer depth and to constantly be aware of the spatial relationship in three dimensions: camera, subject, and background.
- Embrace Telephoto Lenses: A portrait telephoto like an 85mm lens is exceptional for creating separation.
- Leverage Compression: Its longer focal length offers fantastic focal length compression, which naturally enhances the beautiful, blurry backgrounds (bokeh) without needing an ultra-wide aperture.
- Works in Tight Spaces: This technique is surprisingly effective even in smaller areas like a getting-ready room. By positioning the subject far from the back wall and using a longer lens, you can isolate them from clutter.
Vintage Lenses With Character Bokeh or Modern Sharp Optics: Which Creates More Pleasing Wedding Background Blur
The modern lens market is dominated by a quest for optical perfection: maximum sharpness, zero distortion, and flawless, clinical rendering. While technically impressive, this perfection can sometimes feel sterile. This has led a growing number of photographers to explore vintage lenses from the pre-digital era. These lenses, often designed with simpler coatings and different optical formulas, offer something modern lenses strive to eliminate: character. Their imperfections, from soft contrast to unique flare and, most importantly, distinctive bokeh, become artistic tools.
Lenses like the Helios 44-2, famous for its “swirly bokeh,” render backgrounds in a way that is painterly and dreamlike. The out-of-focus areas don’t just blur; they twist and swirl around the subject, creating a vortex effect that draws the eye inward. This is not “better” or “worse” than the clean, smooth bokeh of a modern G Master or L-series lens; it is a distinct aesthetic choice. For a wedding photographer looking to cultivate a unique, romantic, and slightly nostalgic style, a vintage lens can be a powerful secret weapon.
As photographer Alik Griffin notes, “The Helios 44-2 is the cheapest way into vintage swirly bokeh — and one of the best.” This highlights the accessibility of these tools. For a fraction of the cost of a modern prime, you can acquire a lens that provides a truly unique optical signature. The trade-off is often a lack of autofocus and a softer overall image, but for deliberate portrait sessions, these are minor hurdles in the pursuit of an unforgettable look.
Action Plan: Taming a Vintage Lens on a Modern Camera
- Confirm Mount Compatibility: First, verify that an adapter exists for your specific lens and camera combination. If you use a mirrorless camera, you’re in luck; you can adapt almost any vintage lens.
- Budget for the Adapter: The lens itself might be inexpensive, but you’ll need a proper adapter. You can find quality adapters for nearly all mirrorless systems on sites like Amazon, typically costing between $10 and $20.
- Double-Check Everything: Before purchasing, an essential step is to double-check that the adapter you’ve chosen is correct for both the lens mount (e.g., M42) and your camera body (e.g., Sony E-mount).
- Practice Manual Focus: These lenses are fully manual. Use your camera’s focus peaking and magnification tools to nail focus, especially at wide apertures where the depth of field is razor-thin.
- Embrace the Imperfections: Don’t fight the lens flare, the soft corners, or the lower contrast. Learn to use these characteristics as part of your creative style to produce images that feel organic and emotional.
The Extreme Bokeh Mistake That Obliterates All Environmental Context in Wedding Venue Photography
In the quest for the creamiest bokeh, it’s easy to fall into a trap: shooting every single portrait with the aperture wide open. While an f/1.4 aperture can create stunning subject isolation, it can also be a storytelling crutch that does a disservice to your clients. Couples often spend a significant portion of their wedding budget on a breathtaking venue—a historic manor, a scenic vineyard, or a grand ballroom. When you obliterate that background into an unrecognizable smear of color, you are effectively erasing the context and a huge part of their wedding day story.
This is the extreme bokeh mistake. It’s the failure to recognize that sometimes, the environment is not a distraction to be eliminated, but a secondary character to be included. A portrait of a couple where you can just make out the elegant arches of the chapel or the rolling hills of the estate behind them is often far more powerful and meaningful than one where they are floating in an abstract void. The art of a great wedding photographer lies in finding the perfect balance between subject pop and environmental detail.
This is where the concept of “contextual aperture” comes into play. Instead of defaulting to f/1.4, try shooting at f/2.8, f/4, or even f/5.6 for some environmental portraits. Use your understanding of focal length and subject-to-background distance to maintain separation while allowing just enough detail in the background to give a sense of place. This considered approach demonstrates a higher level of artistry. It shows you are not just a technician executing a formula (“blur the background”), but a storyteller consciously deciding which elements of the scene are essential to the memory you are creating.
Which Wedding Moments Benefit From Dreamy Bokeh and Which Require Sharp Environmental Detail
Mastering bokeh is not just about knowing how to create it, but, more importantly, knowing when to use it. A wedding day is a fluid narrative with different chapters, each demanding a distinct visual approach. Applying a shallow depth of field indiscriminately can weaken the overall story. The key is to have a mental shot list that pairs the right technique with the right moment.
Dreamy, maximum bokeh is your go-to tool for moments of intimacy, emotion, and detail. It’s perfect for:
- Getting Ready: As photographer Marc from Bergreen Photography explains, “For weddings, bokeh is really nice in the getting ready room where the room is cluttered and my goal is to make a bride feel beautiful.” It isolates the subject from distracting backgrounds.
- Intimate Portraits: During the couple’s portrait session, especially during golden hour, wide apertures create a romantic, focused atmosphere that emphasizes their connection.
- Detail Shots: A super shallow depth of field on wedding rings, a single flower in the bouquet, or the texture of a dress highlights these important elements with an artistic, focused flair.
Conversely, some of the most important shots of the day require a deeper depth of field to preserve context and detail. Sharp environmental detail is crucial for:
- The Grand Scenic: The wide shot of the couple in the vast landscape or in front of their magnificent venue. Here, the environment is the hero, and an aperture of f/5.6 to f/11 is more appropriate.
- The “I Do”: The ceremony shot that includes the couple, the officiant, and the architectural or natural setting of the altar. You want this memory to have a clear sense of place.
- Large Group Photos: Family formals and wedding party shots require an aperture (like f/4 to f/8) that ensures everyone, across multiple rows, is in sharp focus.
A moment-by-moment shot list is an invaluable tool. It recommends using fast primes like a 50mm f/1.2 or 85mm f/1.4 for moments that benefit most from bokeh, such as golden hour portraits and indoor receptions with string lights, to achieve that smooth, creamy look.
85mm f/1.4 or 135mm f/2:How to Anticipate and Capture Candid Wedding Moments Before They Vanish Forever
When it comes to capturing the fleeting, unposed moments of a wedding day, your lens choice is critical. While a zoom lens offers versatility, classic portrait prime lenses like the 85mm and 135mm are revered for a reason. Their combination of a wide aperture and telephoto compression makes them unparalleled tools for creating beautiful, candid portraits that feel both intimate and unobtrusive. These focal lengths allow you to stand back, giving guests and the couple space to act naturally while you isolate perfect expressions and interactions from afar.
The 85mm is often hailed as the quintessential portrait lens. According to a survey of over 300 professional wedding photographers, the 85mm prime is a top choice, touted for giving “compression with a shallow depth of field, making it perfect for tight portraits within a scene.” It provides a comfortable working distance that isn’t too detached, allowing you to capture raw emotion without intruding on the moment. As photographer Katie Ralynn puts it, “The 85mm f/1.4 lens is my absolute favorite lens for portraits! You can just about bet if I am shooting portraits on a wedding day this is what I am shooting with.”
The 135mm f/2 (or f/1.8) takes this concept a step further. It offers even more compression and subject-background separation, creating an almost surreal, painterly quality. It requires more space to work with but rewards the photographer with incredibly flattering portraits where the background melts away completely. It is the perfect tool for capturing a quiet glance between the couple during the reception or a tearful hug from a distance. The choice between them often comes down to working style and space, but both are masters of turning candid moments into art.
This table breaks down the practical behavior of the popular 85mm focal length for candid work.
| Aspect | 85mm Lens Behavior |
|---|---|
| Candid distance | An 85mm allows you to keep your distance during candid shots and focus on each person individually. |
| Background rendering | Portraits can look beautiful with an 85mm prime lens because of the background blur that can be achieved with a wide aperture. |
| Trade-off | With an 85mm prime lens, we lose the ability to get wider photos, such as group shots. |
How to Create Soft Wrap-Around Portrait Light Using Large Diffusion Modifiers
The “dreamy” quality of a wedding portrait is not born from bokeh alone. It is a marriage of soft background blur and, just as importantly, soft, flattering light on the subject. Harsh, direct light creates hard shadows and unflattering specular highlights, which clash with the gentle rendering of a creamy background. To create a cohesive, ethereal look, the quality of your light must match the quality of your bokeh. The key to this is using large diffusion modifiers.
A large light source relative to the subject produces softer light. This is why overcast days provide such beautiful, soft illumination—the entire sky becomes a giant softbox. You can replicate this effect with artificial light by using modifiers like a large octabox, a shoot-through umbrella, or a large diffusion panel (like a 4×4 or 6×6 foot scrim). These modifiers take a small, hard light source (your flash or strobe) and spread it over a larger area, causing the light to “wrap” around your subject. This wrap-around effect softens the transition between light and shadow, minimizing harsh lines and creating a gentle, sculpting light that is incredibly flattering for portraits.
When setting up your light, place the large modifier close to the subject and slightly to the side (around 45 degrees) to create soft modeling and dimension. The goal is not to create flat, shadowless light, but to create soft-edged shadows that define facial features gently. This soft, dimensional light harmonizes perfectly with the soft-focus background, creating a unified and professional aesthetic. Even on a sunny day, you can use a large scrim to diffuse the harsh sunlight, turning it into a beautiful, soft key light for your portraits.
Key takeaways
- Bokeh quality is determined by lens mechanics (aperture blades), not just f-stop. More numerous, rounded blades create smoother blur.
- Mastering distance (subject-to-background) and using focal length compression are powerful techniques to increase separation without buying faster lenses.
- The “best” aperture is contextual; stop down to f/2.8 or f/4 to preserve the story of the venue, avoiding the “extreme bokeh mistake.”
How to Create Cinematic Depth of Field That Makes Wedding Photos Look Like Film Stills
The final evolution of mastering depth of field is to move beyond simple subject-background separation and start thinking in terms of creating cinematic depth. Film stills often feel immersive because they utilize multiple visual layers—a foreground, a mid-ground, and a background. By consciously composing your wedding photos with these three planes, you create a sense of dimensionality that pulls the viewer into the frame and elevates the image from a portrait to a story.
This technique involves more than just blurring the background. It requires you to actively use foreground elements. Shoot through foliage, a doorway, a string of lights, or over the shoulder of a guest. These foreground elements, when rendered out of focus, frame your subject and create a natural leading line for the eye. The resulting image has a soft, blurry foreground, a sharp mid-ground (your subject), and a soft, blurry background. This layering is the very essence of a cinematic look.
To achieve this, you need a slightly different mindset. Instead of looking for a “clean” background, you start looking for interesting “dirty” frames. A 35mm or 50mm lens is often perfect for this, as it allows you to include more of the environment. You may need to use a slightly deeper depth of field (like f/2.8 or f/4) to keep the context clear while still rendering the foreground and background out of focus. The result is a rich, layered composition that feels dynamic, voyeuristic, and deeply narrative.
By moving beyond the simple goal of a blurry background and focusing on the quality of your bokeh, the context of your environment, and the layers within your frame, you can begin to craft a signature style that is both technically proficient and artistically compelling. The next step is to consciously practice these techniques on every shoot, transforming your understanding of depth of field into a powerful storytelling tool.